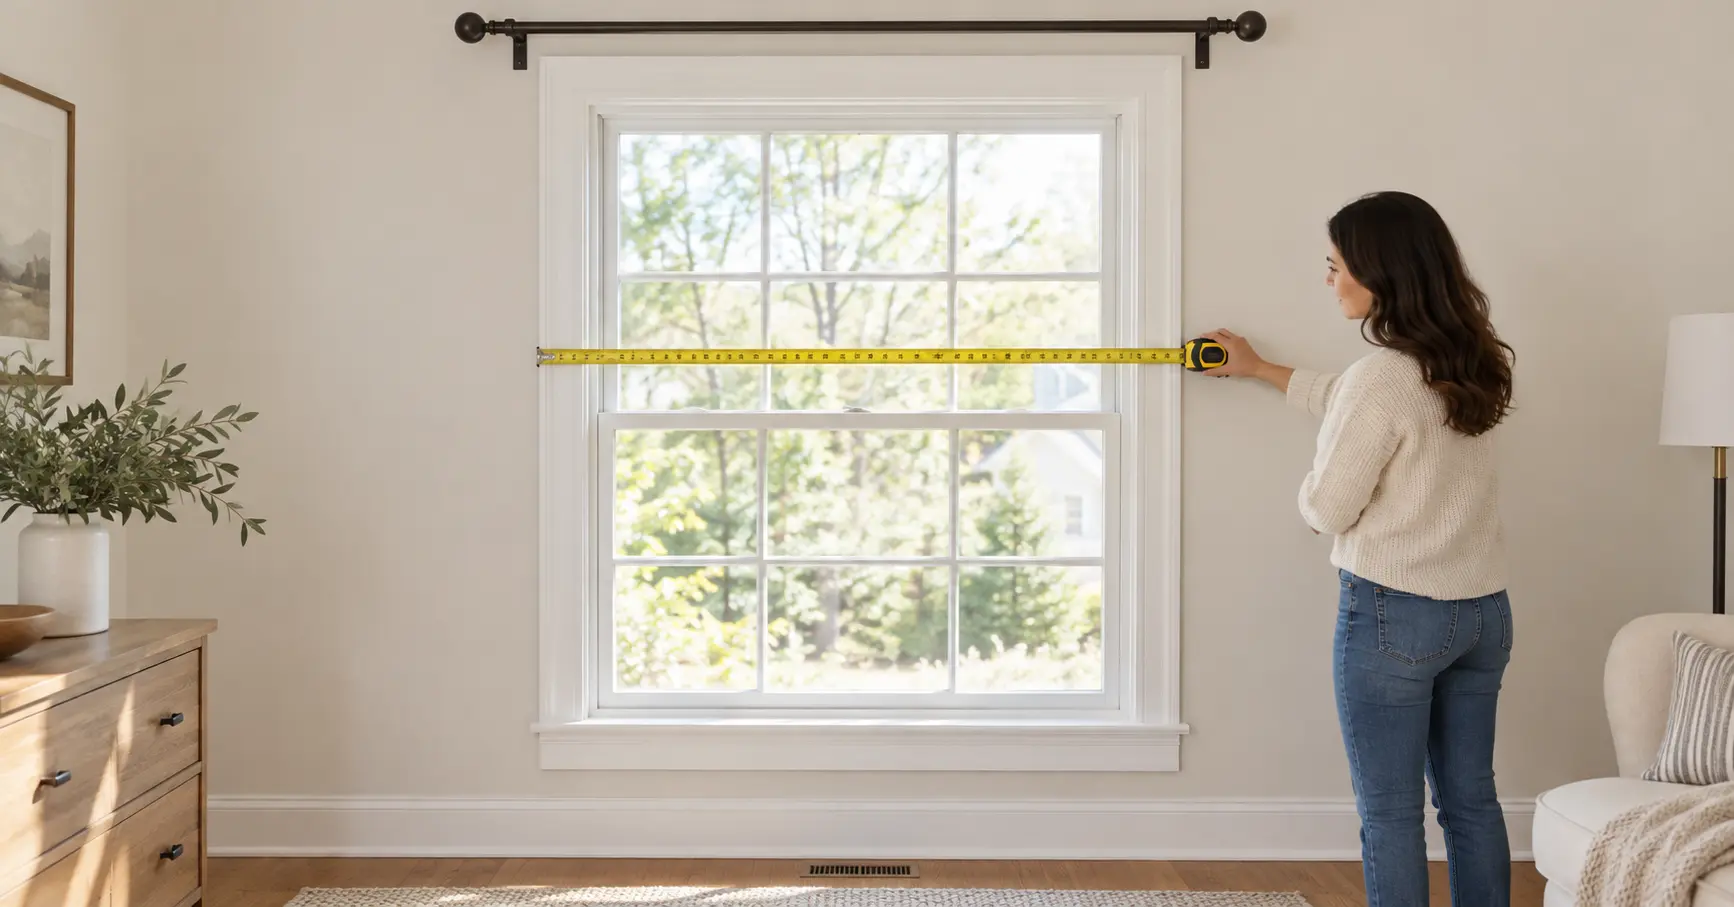

To measure for an outside-mounted curtain rod, measure the window from the outside edge of the trim on one side to the outside edge on the other. Add the planned rod extension on the left and right. Around 6-12 inches per side is a useful starting range where wall space allows, but the final allowance depends on curtain stack-back, available space, and the intended coverage.
Planned rod length = window (outside trim) width + left extension + right extension
For example, a 48-inch-wide window with 8 inches added on each side would need a planned rod length of 64 inches, not counting finials.
Before purchasing, also measure the mounting height, the available wall space, and bracket projection, and check curtain compatibility. For an inside-mounted or tension rod, measure between the surfaces where the rod will actually be attached, rather than the window trim.
What You Need Before Measuring
Gather:
- A metal tape measure
- A pencil
- Paper or a phone for recording measurements
- A level
- A stable step stool if needed
- Painter’s tape for marking the proposed layout
Use a metal tape that can be held straight rather than a fabric tape. Record measurements consistently in inches or centimetres, and always measure each window individually even if they look the same.
For ordinary decorative hardware, a measurement to the nearest 1/8 inch is usually practical, but for custom hardware follow the supplier’s instructions for required precision and ordering information.
1. Choose an Inside or Outside Mount
Your choice of mounting will determine where you need to place the tape measure.
| Mounting method | Where to measure | What to consider |
|---|---|---|
| Outside-mounted rod | Across the outside edges of the window trim, then add side extensions | Wall space, stack-back, finials, and bracket clearance |
| Inside-mounted rod | Between the intended mounting surfaces within the opening | Recess depth, bracket dimensions, and manufacturer deductions |
| Tension rod | Between opposing surfaces at the exact installation height | Adjustment range, suitable surfaces, and load rating |
| Ceiling-mounted system | Along the proposed rod or track route | Ceiling fixings, wall clearance, and the system’s measuring instructions |
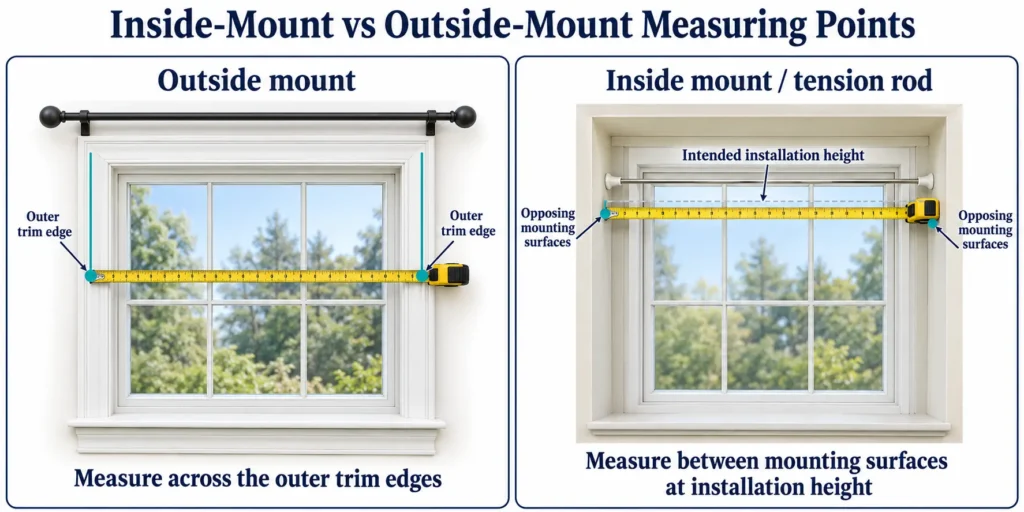
An outside mount provides space for the curtains to gather beside the window when open. An inside mount keeps the hardware within the opening, but the gathered fabric may cover part of the glass.
Before choosing, take note of nearby walls, cabinets, crown moulding, blinds, handles, door swings, and heating equipment. For heating appliances, follow the manufacturer’s instructions for safe clearance rather than assuming floor-length curtains will be okay beside them.
2. Understand the Different Width Measurements
| Measurement | Meaning |
|---|---|
| Window width including trim | Distance between the outer edges of the window casing |
| Rod length excluding finials | Length of the rod body, without decorative ends |
| Overall hardware width | Complete installed width, including any projecting finials or end caps |
| Bracket spacing | Distance between the supports, measured using the manufacturer’s reference points |
| Usable curtain travel | Part of the rod or track the curtain hardware can move along |
| Curtain coverage width | Span the closed curtains must cover, including any required overlap or returns |
These different measurements are related, but they are not always the same. For example, a centre bracket can prevent ordinary rings from passing across the centre of a rod.
Check the product diagram before ordering, since a retailer’s advertised adjustable length may exclude decorative ends, but a custom supplier may ask for bracket spacing or overall dimensions.
3. Measure the Window and Available Wall Space
For an outside mount, measure the distance from the outside edge of the trim on the left to the outside edge on the right.
If there is no casing, measure the opening from edge to edge. Don’t use the width of only the visible glass when there is a frame to be covered as well.
For several windows under a continuous rod, measure from the far left outside edge of the first window to the far right outside edge of the last window.
Record the clear wall space on either side of the window:
- Left: From the outside trim to the nearest corner, cabinet, or other obstruction
- Right: The same measurement taken independently
- Above: From the top of the trim to the ceiling, crown moulding, or other obstruction
Don’t assume that the left and right sides will have the same amount of room, and remember that finials may need additional clearance beyond the ends of the planned rod.
If the trim is not square, take multiple measurements so that you plan for the widest dimension that the curtains need to cover, while keeping the proposed rod level.
4. Calculate the Planned Rod Length
For a straight outside-mounted rod, you can use this formula:
Rod length = window width including trim + left extension + right extension
Example in inches
A window is 48 inches wide across the outside trim, and you want 8 inches beyond each end:
48 + 8 + 8 = 64 inches
This planned rod length would be 64 inches not counting finials.
Example in centimetres
A window is 120 cm wide across the trim, and you want 20 cm beyond each end:
120 + 20 + 20 = 160 cm
This planned rod length would be 160 cm not counting finials.
These are only planning calculations. Double-check the dimensions of your chosen hardware before placing an order.
5. Allow Enough Extension for Curtain Stack-Back
Stack-back is the space needed for the width of the curtain when it is gathered open. The side extension provides room for the fabric to stack back beside the window.
A starting allowance of around 6-12 inches or 15-30 cm per side is often appropriate for outside-mounted treatments, but it does not ensure that every curtain will clear the glass. Fuller panels may require more space.
| Situation | How to choose the extension |
|---|---|
| Lightweight curtains with moderate fullness | Start within the general range and check the gathered width |
| Thick, lined, or very full curtains | Allow more room if the open fabric needs it |
| Window close to a corner | Measure the actual space and account for the finial |
| Curtains opening to one side | Allocate stack-back space on the receiving side |
| Stationary decorative panels | Plan around the panels’ displayed width and intended glass coverage |
A 4-inch extension per side may be possible in a limited space, but don’t assume this is a minimum or that it will clear the entire width of the window.
How to check actual stack-back
If you already own the curtains, try hanging or holding them on the proposed hardware and gathering them open to see how much width they occupy.
Compare this to the available space on either side, and note how the brackets might affect the positioning.
For new custom curtains, request a stack-back estimate based on the fabric, lining, heading, and fullness. There is a great deal of difference between a sheer panel and a fully lined curtain in how much width it takes when gathered.
6. Check Finial Clearance and Overall Width
Finials are the decorative pieces at the ends of the rod, but they can make the complete hardware too wide for the available wall space, even if the rod itself clears.
For a hypothetical rod with finials that project an additional 3 inches beyond each end:
| Component | Measurement |
|---|---|
| Rod length excluding finials | 64 inches |
| Additional left finial projection | 3 inches |
| Additional right finial projection | 3 inches |
| Overall installed width | 70 inches |
Always use the additional installed projection of the finial rather than the complete length from end to end, since part of the piece may actually overlap the rod.
If there is a clearance issue, make sure the system has compact end caps available, and confirm the overall width from the manufacturer’s diagram.
7. Choose the Mounting Height
A common starting point is 4-6 inches above the trim, but higher placement is possible in some cases, so long as the curtains are long enough and the hardware fits beneath the ceiling or crown moulding.
Establish the desired position of the hem before marking the brackets.
| Curtain finish | Intended hem position |
|---|---|
| Floating | A small clearance above the finished floor |
| Touching the floor | Hem just meets the floor |
| Slight break | A little extra fabric bends at the floor |
| Puddled | Additional fabric rests on the floor |
| Sill or apron length | Ends at the sill or below it, as planned |
A floor clearance of around 1/2 inch is often used for floating curtains, but always consider the actual surface and the path of travel for the curtain.
If you already own the curtains
Try temporarily fitting the actual ring, clip, hook, or rod section and position the hem where you want it before working up to establish the position of the rod.
Don’t assume that a 96-inch panel will need a rod 96 inches from the floor. Rings, clips, heading construction, and fabric above the rod can all change the relationship.
If you are ordering new curtains
Establish the rod height first. After installation, confirm the curtain drop using the reference point specified by the supplier for your chosen heading.
Always measure left, middle, and right, since floors are often not level, and keep in mind that curtains meant to clear the floor need to account for the shortest distance and any rug that the hem would travel over.
The rod centreline and the bracket screw holes are two different reference points, so use the installation template to transfer the planned rod height into the bracket positions.
8. Measure Bracket Projection and Clearance
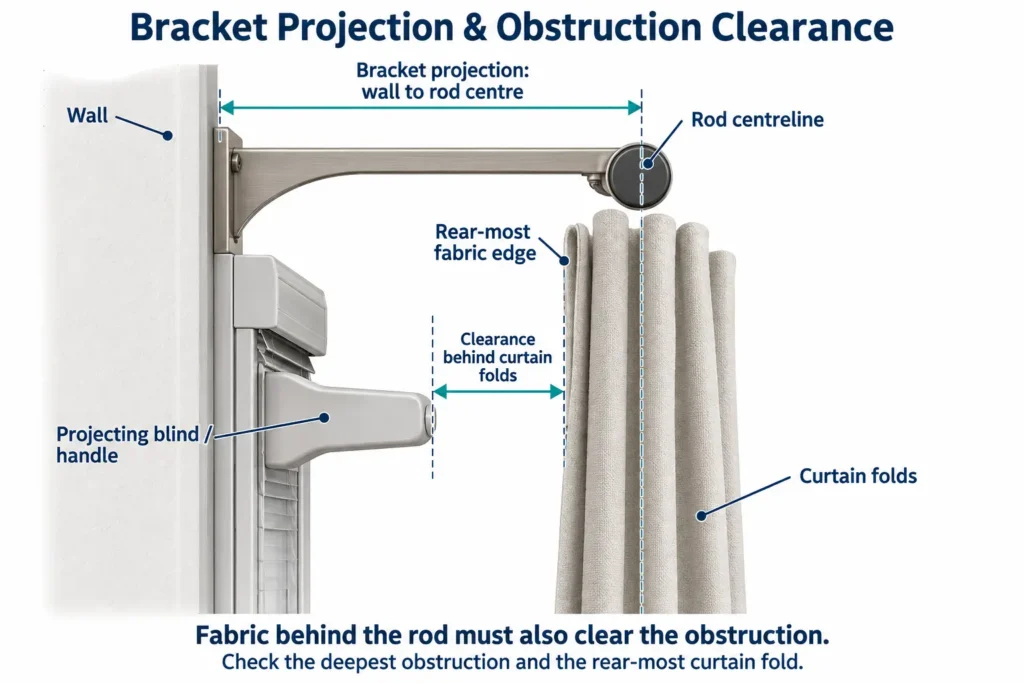
The bracket projection determines how far the rod will extend from the wall, but the clearance is the space for the fabric to clear an obstruction.
Projections may be defined to the centreline of the rod, the tip of the bracket itself, or another feature, so always refer to the diagram when comparing products.
Measure how far the deepest obstruction projects outward from the mounting wall. This could be a blind, shutter, handle, or projecting trim.
Then allow space for the folds of the curtain to move freely past it. Consider that grommet curtains create folds on either side of the rod, so it may not be enough to simply clear an obstruction with the centreline.
Curtain return is the amount of fabric that extends back toward the wall at the side of a treatment, but it is not the same thing as bracket projection.
For double rods, make sure that the back curtain clears the window and that the front curtain clears the back fabric, and check that brackets and finials will fit.
9. Choose an Adjustable Rod Range That Fits
A rod that is advertised as 48-84 inches means that it can be adjusted to fit within that range. Your planned length needs to be within the allowed range of the manufacturer.
If you need a 64-inch rod, a product advertised as adjustable from 48-84 inches may fit. Check its load rating and support requirements, confirm whether the advertised range includes or excludes finials, and verify that the complete installed hardware fits the available wall space.
| Buying check | What to confirm |
|---|---|
| Adjustment range | Includes the target rod length |
| Tube overlap | Meets the manufacturer’s requirements at that extension |
| Support brackets | Suitable for the span and curtain arrangement |
| Load capacity | Adequate for the complete treatment |
| Overall dimensions | Fit the available wall space |
Don’t automatically reject a rod because it will be near the top of the range if the manufacturer specifically rates it for that installation, but compare it to a longer or stronger rod if the curtains are heavy or the span is large.
Ranges vary between retailers, so always choose from the actual product specifications rather than a generic size guide.
10. Check Diameter, Heading Compatibility and Supports
A rod needs to fit the curtain heading and support the treatment.
Grommets, rings, or the rod pocket need to accept the outside diameter of the rod. Rings need to have enough clearance to move, and a tight pocket may be okay for a stationary curtain but inconvenient for regular use.
Consider the material, wall thickness, construction, span, and spacing between brackets for strength, and always follow the manufacturer’s instructions for end and centre brackets. There is no absolute span that requires a centre support for every rod. Diameter alone does not establish strength. Check the manufacturer’s rated load at the intended extension and bracket spacing.
Ordinary rings generally do not travel across a centre bracket, so if a single panel needs to travel across the middle of the rod, choose hardware designed for this type of movement, such as an appropriate traverse system or track.
11. Coordinate Rod Width with Curtain Fullness
With the hardware planned, determine the curtain width.
For many ready-made panels sold by their flat width:
Combined flat panel width = curtain coverage span × chosen fullness
For a simple 64-inch coverage span at 2× fullness:
64 × 2 = 128 inches of combined flat curtain width
This would be 64 inches per panel if there are two equal panels.
The range of 1.5-2.5× fullness often works well for ready-made treatments, depending on the heading, fabric, and desired effect, but always check if the dimensions given in the package describe each panel or the complete pair.
For fixed pinch-pleat or wave curtains, the fullness may already be factored into the finished width or system specification from the supplier, so don’t multiply an already pleated width unless instructed to do so.
Keep the curtain fullness separate from the rod extension. More fabric can create a wider stack when open, but doubling the window width is not a rule for the length of the rod.
12. Measure Special Windows and Doors
Windows near corners
Measure each side individually and allow space for decorative ends. You may need compact end caps, an asymmetric arrangement, or a completely different system.
Bay and corner windows
Sketch each straight section, label the angles, and note any obstacles. Connector allowances and reference points vary between systems, so always follow the bay-window instructions from the supplier before ordering.
Sliding glass doors
Measure the outside frame and identify the active panel. Allow space where the curtains gather, but keep the access route clear.
For a one-way draw, confirm that the system will allow the curtain to travel across all the required supports.
Two or more neighbouring windows
For one continuous treatment, measure the entire group including the space between windows. Check the positions of supports and whether separate sections of curtain need to operate independently.
French doors
For door-mounted curtains, measure each glazed area and note handles, locks, and any lower retaining rod. For a wall-mounted treatment above the doors, check the overall door swing as well as the curtain stack.
Ceiling-mounted rods or tracks
Record the intended route and distance from the wall. Check the suitability of the ceiling, bracket dimensions, clearance for folds, and the ordering method from the manufacturer.
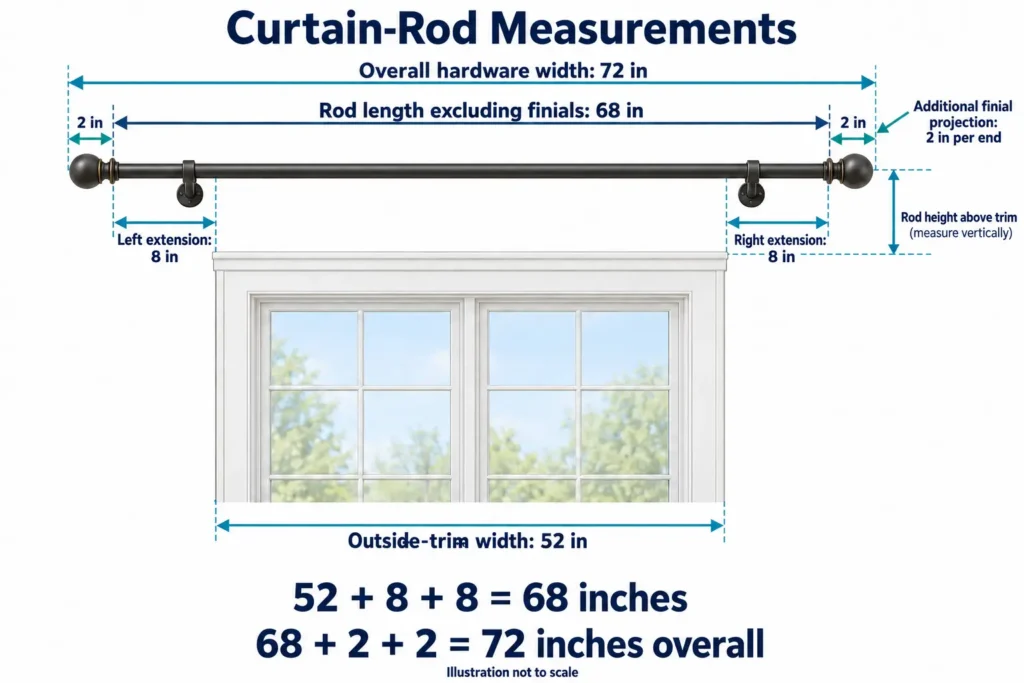
13. Worked Example: From Window Measurement to Hardware Choice
| Item | Planned measurement |
|---|---|
| Window width including trim | 52 inches |
| Left rod extension | 8 inches |
| Right rod extension | 8 inches |
| Rod length excluding finials | 68 inches |
| Additional finial projection | 2 inches at each end |
| Overall hardware width | 72 inches |
| Planned rod centreline | 5 inches above the trim |
You would then:
- Confirm that each side has room for the extension plus its finial
- Check that 8 inches per side accommodates the actual curtain stack
- Choose a rod with a permitted range that includes 68 inches
- Check the projection against blinds, handles, and curtain folds
- Confirm the required supports and curtain travel
- Establish curtain length using the actual heading and intended hem position
If ready-made panels require 2× fullness across a simple 68-inch coverage span, the combined flat width would be 136 inches. Custom pleated curtains may have a different ordering method.
14. Common Curtain-Rod Measuring Mistakes
| Mistake | Possible result | Correction |
|---|---|---|
| Measuring only the glass for an outside mount | Insufficient frame coverage | Measure outside trim first |
| Allowing too little stack-back | Open curtains cover the glass | Measure or estimate the gathered fabric |
| Forgetting finial projection | Hardware hits a corner or cabinet | Check overall installed width |
| Confusing screw-hole height with rod height | Curtain hem sits incorrectly | Use the bracket template |
| Ignoring projection | Fabric rubs against blinds or handles | Check the hardware diagram and folds |
| Assuming rings cross every support | Curtain cannot open as intended | Confirm travel before buying |
| Multiplying an already pleated width | Incorrect custom order | Follow supplier instructions |
| Choosing strength by diameter alone | Unsuitable hardware | Check the rated span and load |
Curtain-Rod Measurement Worksheet
| Measurement or decision | Your record |
|---|---|
| Room and window identification | __________ |
| Mounting method | __________ |
| Outside-trim width or actual inside mounting span | __________ |
| Available left wall space | __________ |
| Available right wall space | __________ |
| Planned left and right extensions | __________ |
| Rod length excluding finials | __________ |
| Overall hardware width | __________ |
| Planned rod height and reference point | __________ |
| Deepest obstruction from the wall | __________ |
| Required bracket projection | __________ |
| Curtain heading and opening direction | __________ |
| Hanging-point-to-hem measurement | __________ |
| Rod range, rated load, and required supports | __________ |
FAQs
For an outside-mounted rod, measure from the outside edge of one trim board to the outside edge of the other, then add the planned extensions. For an inside mount, measure the actual mounting surfaces that will be within the opening.
Around 6-12 inches beyond the trim on either side can be a good starting point where wall space allows, but the final extension depends on curtain stack-back, opening direction, obstructions, and finial clearance.
For an outside mount, the rod will usually extend beyond the window trim to provide coverage and space for open curtains. An inside-mounted rod fits between the mounting surfaces within the opening, so it does not extend beyond the window in the same way.
For an outside mount, add the left and right extensions to the outside-trim width. Choose a rod whose permitted adjustment range includes that result, then check finial clearance, load capacity, and supports. For an inside mount, use the actual mounting-span measurement and the manufacturer’s ordering instructions.
If the required span exceeds the rod’s permitted maximum extension, replace it with a longer suitable rod or use a manufacturer-approved extension system. Do not reduce the required tube overlap or improvise a connector. Recheck support requirements and overall width before installing the replacement.
Measure between the intended mounting surfaces inside the opening. For a tension rod, take the measurement at the exact installation height. For a bracket-mounted rod, follow the manufacturer’s instructions for bracket allowances or deductions. Check recess depth, mounting surfaces, adjustment range, and load capacity.
Sketch each straight section, label the angles, and note any obstacles. Connector allowances and reference points vary between systems, so always follow the bay-window instructions from the supplier before ordering.
Measure each side individually and allow space for decorative ends. You may need compact end caps, an asymmetric arrangement, or a completely different system.
Measure the outside frame and identify the active panel. Allow space where the curtains gather, but keep the access route clear.
For door-mounted curtains, measure each glazed area and note handles, locks, and any lower retaining rod. For a wall-mounted treatment above the doors, check the overall door swing as well as the curtain stack.