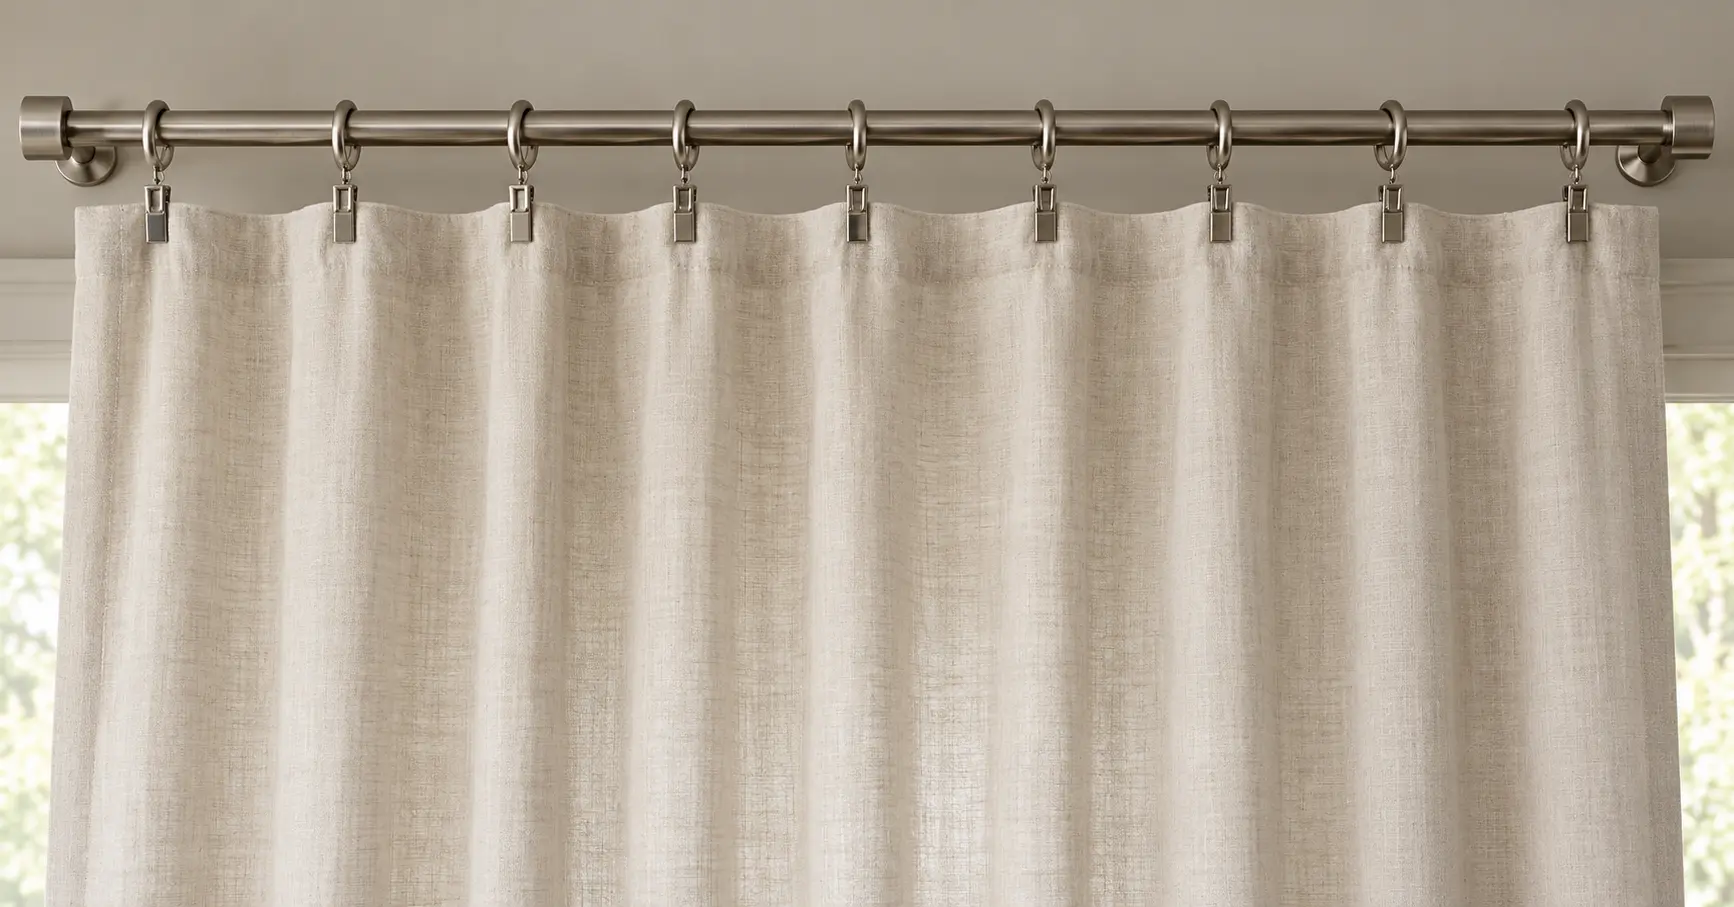

For a 50-52″ flat panel, 9-11 curtain rings are a good starting point with regard to the chosen spacing and edge insets (see the following section). Distribute the clips evenly along the panel’s top and observe the resulting hang. For pinch-pleat curtains, count the number of pleats (or installed hooks) and any additional edges supported by rings, instead.
There are no hard-and-fast rules when it comes to the number of rings per curtain. The panel’s width, type of heading, presence of a lining, clip rings’ strength, the desired formation of folds, etc., all play a role in the final selection.
For example, a 52″ wide flat panel with 1″ insets on both sides will need 10 rings to keep the spacing no greater than 6″ (or 11 rings for 5″ intervals).
Measuring the Panel’s Width, not the Length of the Curtain
Take one flat curtain panel, lay it flat and measure its finished width across the top. This is the number we will use to determine how many freely-positioned clip rings will be needed.
If the label states “52 × 84″, it usually means that the curtain is 52″ wide and 84″ tall (but always verify if the seller used the same sequence of measurements). The 84” drop has no bearing on how many rings will be needed to space them along the top.
Check if the package specifies the width of one panel or the combined width of two panels. Two panels of 52″ would give you 104″ of flat fabric width, but you will have to calculate the number of rings required for each one.
| Measurement | How it affects your ring plan |
|---|---|
| Flat panel width | Determines the span available for freely placed clips. |
| Curtain length or drop | Affects hanging height and contributes to curtain weight. |
| Rod width | Helps plan curtain coverage and fullness; it is not a substitute for each panel’s width. |
| Pleated heading width | Describes the constructed heading; ring locations usually follow its hooks or pleats. |
Do not pull apart sewn pinch pleats to apply a flat-panel spacing formula. Their attachment points are already part of the curtain’s construction.
How to Calculate Curtain Rings Per Panel
For flat curtains with freely positioned clip rings, first choose the distance from each side edge to the first and last clip. These distances are the edge insets.
Next, select a maximum gap between neighbouring attachment points. Around 4–6 inches (10–15 cm) is a practical starting range to test, rather than a requirement for every curtain.
Use this formula:
Rings per panel = round up [(panel width − left inset − right inset) ÷ maximum spacing] + 1
Round up the result inside the brackets before adding one. The division calculates the number of gaps, and you need one more ring than gaps.
Ten rings create nine gaps—not ten.
Once you know the count, calculate the equal spacing:
Actual spacing = (panel width − left inset − right inset) ÷ (rings − 1)
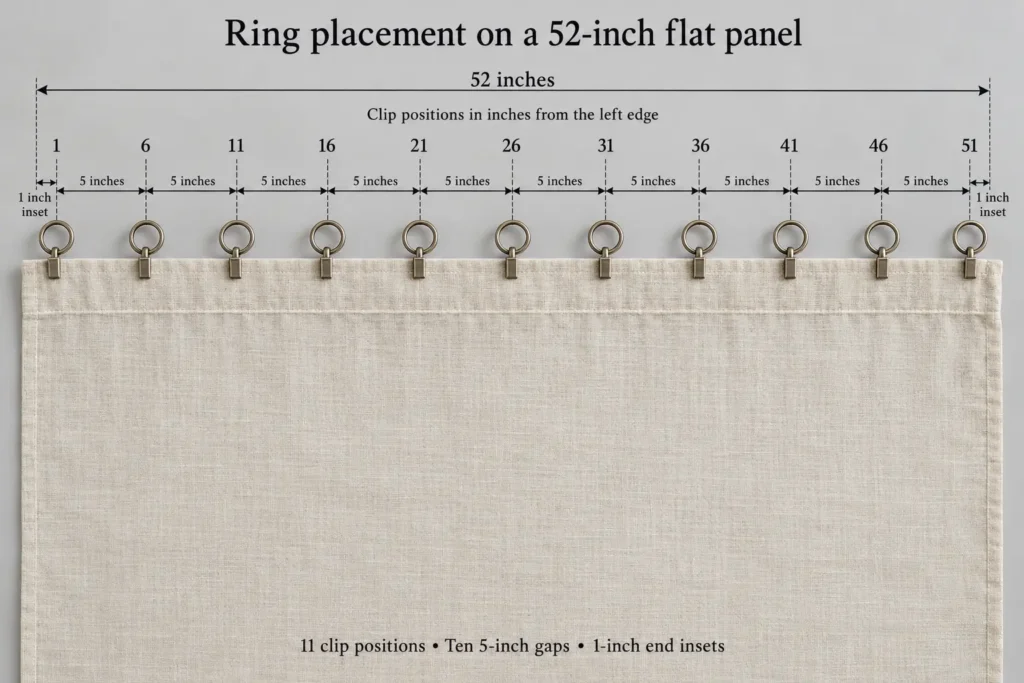
Worked Example: A 52-Inch Panel
Suppose your curtain is 52 inches wide, with the first and last clips each one inch from their side edge. You want gaps no larger than six inches.
- Span between the end clips: 52 − 1 − 1 = 50 inches
- Required gaps: 50 ÷ 6 = 8.33; round up to 9
- Ring count: 9 + 1 = 10 rings
- Actual spacing: 50 ÷ 9 = approximately 5.56 inches
For a five-inch maximum, the same panel needs 10 gaps and 11 rings.
These formulas plan attachment spacing. They do not establish the load capacity of the clips, rings, rod or brackets.
Curtain Ring Count Chart for Common Panel Widths
The following chart assumes one-inch insets at both ends and equal gaps across a flat panel. Choose a column based on the maximum spacing you want to test.
| Flat panel width | Maximum 6-inch gaps | Maximum 5-inch gaps | Maximum 4-inch gaps |
|---|---|---|---|
| 40 inches | 8 rings | 9 rings | 11 rings |
| 48 inches | 9 rings | 11 rings | 13 rings |
| 50 inches | 9 rings | 11 rings | 13 rings |
| 52 inches | 10 rings | 11 rings | 14 rings |
| 54 inches | 10 rings | 12 rings | 14 rings |
| 60 inches | 11 rings | 13 rings | 16 rings |
| 72 inches | 13 rings | 15 rings | 19 rings |
| 100 inches | 18 rings | 21 rings | 26 rings |
These are calculated layouts, not fixed recommendations by fabric type. If your curtain has specified hook positions or your hardware has installation instructions, use those first.
For metric measurements, use the same formula with every value in centimetres. For example, a 130 cm panel with 2.5 cm insets and a maximum 15 cm gap needs:
Round up [(130 − 2.5 − 2.5) ÷ 15] + 1 = 10 rings
Its actual spacing is approximately 13.89 cm.
How Many Rings for a 50- or 52-Inch Curtain Panel?
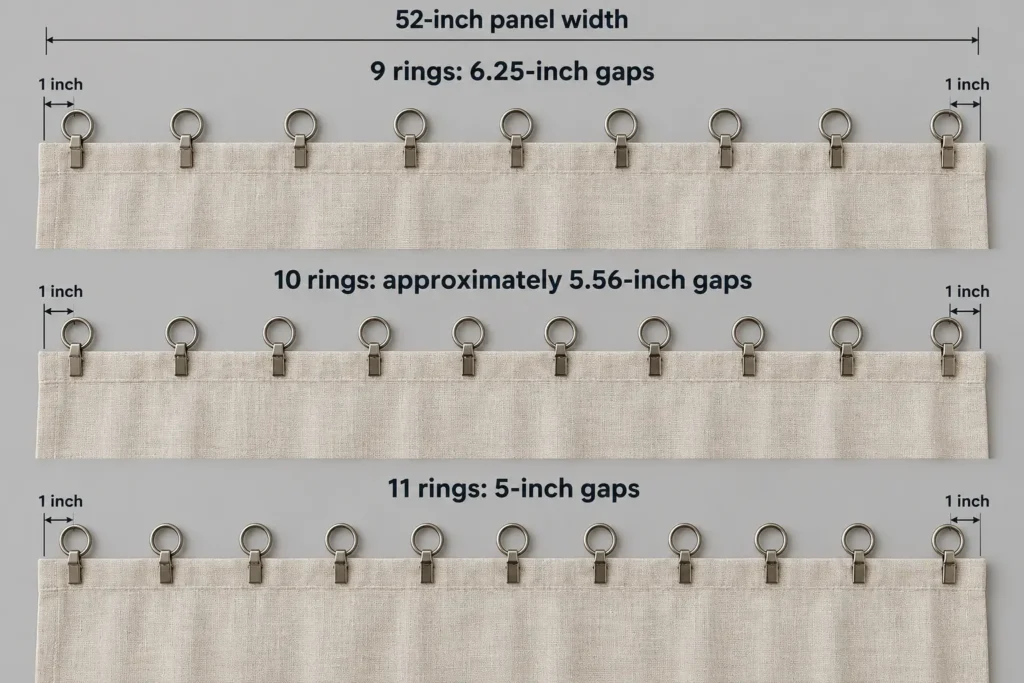
Nine, 10 or 11 rings can produce different layouts on a standard-width flat panel. The useful question is how far apart those rings will sit on your actual curtain.
With one-inch insets at both ends:
| Rings per panel | Gap on a 50-inch panel | Gap on a 52-inch panel |
|---|---|---|
| 9 | 6 inches | 6.25 inches |
| 10 | Approximately 5.33 inches | Approximately 5.56 inches |
| 11 | 4.8 inches | 5 inches |
For a 52-inch panel, 10 rings is a sensible layout to test when you want gaps below six inches. Eleven provides closer support at five-inch intervals.
Nine may suit some curtains, but it does not meet a six-inch maximum with these particular insets. That does not automatically make it wrong; it means the actual spacing is wider.
Choose the arrangement that gives supported edges, attractive folds and reliable operation with your fabric and hardware.
Ring Counts for Different Curtain Headings
The heading is the construction at the top of the curtain. It determines whether you can freely choose ring positions.
| Curtain heading | How to plan the rings |
|---|---|
| Flat panel with clip rings | Calculate spacing across the finished flat top. |
| Pinch pleat or inverted pleat | Count the intended pleat hooks, then include any additional ring-supported edges. |
| Pencil pleat | Gather the heading to its intended width, then position hooks according to the heading-tape and hardware instructions. |
| Back tab used with rings | Follow the compatible attachment method and existing attachment points; support the edges as needed. |
| Grommet or eyelet | Normally threads directly onto the rod, so separate curtain rings are unnecessary. |
| Rod pocket or tab top | Normally hangs directly on the rod; use rings only if the curtain is suitable for conversion. |
| Wave or ripplefold system | Follow the system’s specified carriers, attachments and spacing. |
Pinch-Pleat Curtains: Count the Pleats and Supported Edges
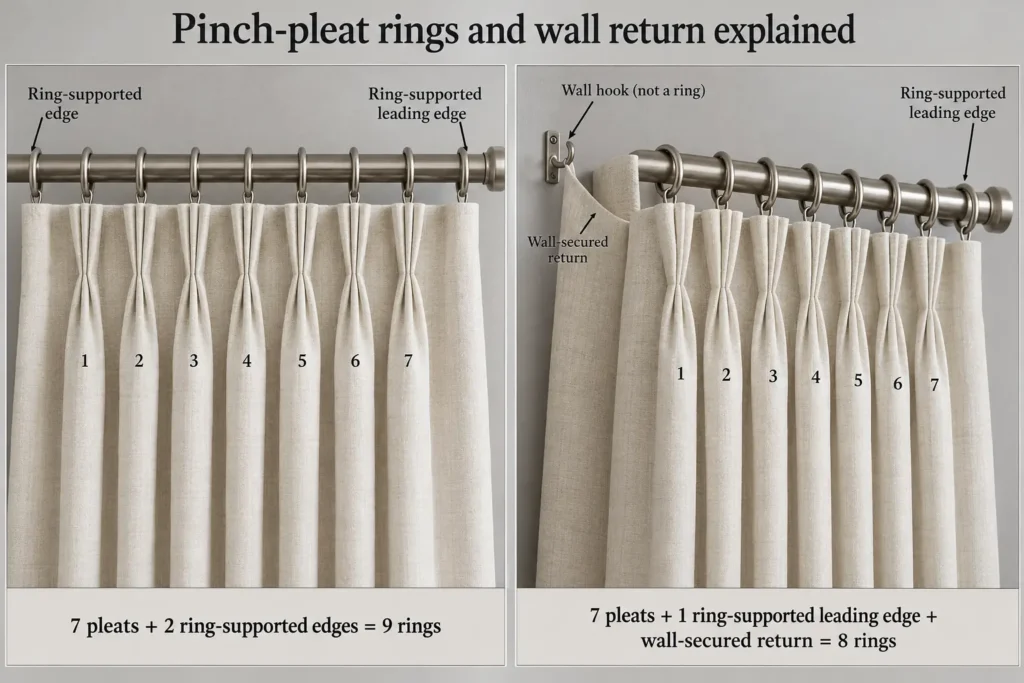
A pinch-pleat panel usually requires a ring for each pleat hook, plus possible additional rings for the leading and/or outer edges. General installation guidance suggests that each pleat and the outside edges should be supported. For example,
- Seven pleats plus two ring-supported edges equals nine rings.
- Seven pleats plus one ring-supported leading edge and one wall-secured return equals eight rings.
Installation guidance advises that calculations differ depending on whether the return is attached to the wall.
The examples assume separate edge hooks, but it is important to examine your curtain as some styles have variations on end hooks.
The individual folds within a double or triple pinch pleat do not require individual rings. Count the number of pleat groups and the intended hooks.
How To Space Your Curtain Rings Evenly
Mark the desired positions on the panel laid flat.
- Decide on your edge insets, then mark your first and last desired positions on the panel laid flat according to your chosen side insets.
- Measure the distance between the first and last marks and divide by the number of spaces between the rings. In this example, the distance between the first and last of 11 rings would be divided by 10.
- Mark each position from the same side edge to reduce measurement errors.
- Attach the clips at the same vertical position.
- Test the placement by hanging one panel and opening and closing the curtain. Examine the folds and the support of the edges.
In this example of a 52-inch panel with 11 clip rings and one-inch side insets, the marks would be made at the following positions from the left edge:
1, 6, 11, 16, 21, 26, 31, 36, 41, 46 and 51 inches.
Each space would be 5 inches between the clips. The measurements are across the flat curtain panel rather than the rod.
Can You Use the Folding Method?
A nine-position example can be created using a nine-clip folding method. Folding the top into eight equal increments results in nine positions including the ends. It is a useful method for spacing nine clips evenly.
Nine rings would not be appropriate for every curtain or window. Remember to decide on your edge insets if you want them. Then determine the span available between the end attachment points and divide accordingly. Use the measuring technique when you need to allow a particular maximum distance between rings.
Do Blackout, Velvet or Sheer Curtains Require Different Numbers of Rings?
The weight of the curtain is a consideration, but the fabric type alone will not dictate the number of rings. A long cotton panel finished with a full lining could be heavier than a short velvet panel with no lining. Blackout curtains can vary greatly depending on the construction.
Take the whole curtain into consideration.
| Curtain characteristic | What to check |
|---|---|
| Heavy or lined fabric | Hardware load limits, secure attachment and header support. |
| Soft, flexible heading | Whether the top sags between clips. |
| Delicate sheer fabric | Whether clips grip without pulling, marking or damaging the fabric. |
| Thick top hem | Whether the clip opens sufficiently and holds securely. |
| Frequent daily use | Whether attachments stay secure while the panel moves. |
Closer spacing can provide more support points, but adding rings does not make unsuitable clips or an overloaded rod reliable. Heavy curtains may need properly installed hooks and reinforced headings.
Lightweight curtains can also sag between widely spaced clips. Test the fabric rather than assuming that every sheer needs fewer rings.
How Many Rings to Buy for Two or More Panels?
Calculate the installed count for each panel, then add the results.
Total installed rings = rings per panel × number of identical panels
For two 52-inch panels using 11 rings each:
11 × 2 = 22 installed rings
Optional spare rings are separate from the installed count.
If you want two spares, your buying quantity becomes 24. For packs of 10:
Packs needed = round up (24 ÷ 10) = 3 packs
| Purchase calculation | Quantity |
|---|---|
| Rings on each panel | 11 |
| Number of panels | 2 |
| Installed rings | 22 |
| Optional spare rings | 2 |
| Desired buying quantity | 24 |
| Packs of 10 required | 3 |
If the panels have different widths or headings, calculate them individually rather than multiplying one count.
Check whether a product listing means individual rings, pairs or complete ring-and-clip assemblies.
End Rings, Leading Edges and Wall Returns
The leading edge is the edge pulled to the centre when closing the curtain – supporting it here will assist in preventing the top corner from drooping.
The outer edge is the edge nearest the wall or outside bracket – some installations turn this edge back towards the wall, forming a return which helps to disguise the side gap.
A return may be attached directly to an appropriate wall hook, rather than to another curtain ring. Counts should include only attachment points which require rings.
Some rod installations also incorporate an outer ring between the bracket and finial to keep the trailing edge in place. This should only be used where the hardware allows.
Ordinary closed rings are generally unable to pass any obstructing support bracket and where the curtain must pass any such brackets, a compatible bypass or traverse system should be used.
Why Do Curtains Sag, Slip or Catch on the Rod?
Use the symptom to identify the problem before adding more rings.
| Problem | Possible cause | What to try |
|---|---|---|
| Fabric sags between clips | Wide gaps or a flexible heading | Reduce the spacing and check header support. |
| Top corners droop | End attachment too far inward or missing edge support | Adjust the end positions or use the intended edge hooks. |
| Fabric slips from clips | Weak grip, unsuitable thickness or excessive load | Use compatible clips or an appropriate hook system. |
| Folds look uneven | Unequal spacing or inconsistent clip height | Re-mark positions and attach at a consistent height. |
| Rings catch at a bracket | Hardware cannot pass the support | Check the rod design and bypass compatibility. |
| Rings snag at a rod joint | Rough joint or diameter transition | Inspect the rod and follow the hardware instructions. |
| Rod bends or brackets loosen | Inadequate support or excessive curtain weight | Correct the rod, bracket and fixing arrangement. |
| Curtain stacks too tightly when open | Fabric and hardware occupy the available stack-back space | Review the rod extension, ring layout and available wall space. |
More rings can change how folds form, but they do not increase fabric fullness. Fullness depends on the amount of curtain fabric relative to the span it covers.
Curtain Ring Size and Hanging Height
Measure the inner diameter of the ring and compare it with the rod diameter, and consult the compatibility chart provided by the manufacturer – the ring should slide easily along the rod, including joints, if applicable.
Make sure not to mistake the ring’s outer diameter for the distance between the sides of the opening in which the curtain rod is inserted.
In addition, check the compatibility of the ring eyelet with your drapery hook or the clip with the curtain heading.
Recall that rings and clips affect the hanging height of the curtains. Before you hem the curtains, hang the rings or clips and measure from the place where you are going to attach your curtain fabric down to the desired hem level. This will give you the necessary finished curtain length, accounting for the ring, clip or hook.
FAQs
Some cases yes, others no. On a 52-inch flat panel with one-inch end insets seven rings will create six gaps of approximately 8.33-inches. This is a wider space than the suggested 4-6-inch starting range. Check for sagging and additional support.
For a flat panel with one-inch insets, use 10-rings for approximately 5.56-inch gaps or 11 for 5-inch gaps. Pleated panels will use their intended hook positions.
For flat clip-ring panels, you can use either. An odd number will allow a gap in the centre for an attachment point, even will put the centre between two hooks. There is not a default for either. Pleated or other proprietary systems will have their own attachment instructions.
They often need a supported edge, but not necessarily every fold end. Wall-secured returns may use a wall bracket. Count your pleated hooks plus any other sides that actually require rings.
There are options that take weights, but make sure that the rings and attachments are rated for the total curtain weight. For heavy panels a reinforced heading and appropriate drapery hooks may be a safer option.
No, normally. Those are usually the grommets that the rod passes through. Separate clip rings are for a different hanging technique.
Not directly. It adjusts the placement and spacing of the folds, but unless there is enough width in the curtain to allow more fullness, extra links will not help.
It may work, if the windows have similar panels and setups. Match your ring counts to the number of panels, their width, headings and hardware rather than the window itself.