Although drapes can appear complex to make, following some straight forward steps makes this project much more manageable. Ensure that you follow each step in order.
Drapes can be made using very basic sewing equipment. Using basic equipment, good measurements and some patience, lovely drapes can be made.
Depending on what type of drapes you would like to make (simple rod pockets, lined or tailored ‘pinch pleat’ drapes), there are various steps to complete. In general, a basic overview includes taking measurements, cutting out the panels, hemming, adding lining, creating the header and attaching. However, depending on the type of drapes you are creating, the steps will vary.
Using pleater tape we will make lined drapes in this tutorial. This is a great option to create a tailored look for beginners without having to sew in all of the pleats manually.
We will also explore other options for headers, how to calculate fabric quantities and other tips to get professional looking results.
What You’ll Need to Make Drapery Curtains
Gather all materials together before beginning. Decide on what type of drapes you’d like to make.
Although you do not need specialist draping equipment, it is best to have the basic equipment to ensure even seams.
Essential Tools and Materials
| Tool or material | What you’ll use it for |
|---|---|
| Drapery fabric | Main decorative curtain panels |
| Curtain lining | Adds body, improves the finish, and helps protect the face fabric |
| Sewing machine | Stitching seams, hems, and curtain headings |
| Matching thread | Sewing the panels without obvious contrasting stitches |
| Fabric scissors or rotary cutter | Cutting fabric accurately |
| Measuring tape | Measuring the rod, fabric, and finished length |
| Fabric chalk or washable marker | Marking cutting and sewing lines |
| Straight pins or sewing clips | Holding fabric layers together |
| Iron and ironing board | Pressing seams and hems |
| Pleater tape | Creating a gathered or pleated heading |
| Compatible curtain hooks | Attaching the finished curtains to rings or a track |
| Curtain rod or track | Supporting the finished draperies |
It may help to have a large cutting surface. If one isn’t available, a clean section of the floor will work.
Ensure the surface is flat. If you are working with very long curtain panels and your working area is too small, fabric may not be cut evenly.
Choosing the Right Drapery Fabric
This will impact many things such as ease of sewing, drape of the fabric, and weight of the hardware needed.
For your first drapes, choosing a medium weight stable fabric such as cotton or polyester blends is easier to work with than slick fabrics like satin, or heavy fabrics like velvet.
| Fabric | Appearance | Sewing difficulty | What to consider |
|---|---|---|---|
| Cotton | Crisp or casual | Easy | May shrink or wrinkle |
| Linen | Natural, relaxed | Easy to moderate | Can shift during cutting and crease easily |
| Polyester blend | Smooth and versatile | Easy to moderate | Check pressing temperatures |
| Velvet | Rich and luxurious | Advanced | Nap, bulk, and pressure marks need special handling |
| Sheer voile | Light and airy | Moderate | Slippery fabric requires careful cutting |
| Heavy jacquard | Structured and decorative | Moderate to advanced | Pattern matching and seam bulk |
For your first drapes, we recommend using a stable, medium weight fabric that is easy to iron and doesn’t stretch.
If you are using a printed fabric, check the pattern repeat. If you are using large patterns, such as florals and geometric shapes, you may need to allow extra fabric in order to match patterns in joined sections.
Should You Use Lining, Blackout Lining, or Interlining?
Not all drapes require lining, however adding lining can really improve the overall look.
Adding standard lining to your drapes will improve the drape and hide the back of the fabric. It will also provide an extra layer between the decorative fabric and window.
Blackout lining is designed to cut down light entering the room. This can be a good option for bedrooms, however some blackout linings are stiff, coated or thick, which may alter how you sew and iron the drapes.
Interlining is an extra layer between the fabric and lining. It is often used in bespoke drapes to increase volume, softness and insulation.
| Construction | Best suited for | Main consideration |
|---|---|---|
| Unlined | Casual curtains and some sheer designs | Back of fabric remains visible |
| Standard lined | Living rooms, bedrooms, everyday drapes | Requires accurate lining measurements |
| Blackout lined | Bedrooms and light-sensitive spaces | Light can still enter around curtain edges |
| Interlined | Formal, substantial custom draperies | Adds weight, bulk, and construction time |
For our tutorial, we will be using standard lining.
If you are considering blackout drapes to decrease sun and heat in the room, see our blog post on Do blackout curtains reduce heat? for information on how fabric choice, lining and installation will impact the performance of your drapes.
How to Measure Windows for Drapery Curtains
Accurate measurements will help to create nice looking drapes.
A common mistake in DIY projects is measuring for the window glass and not the correct amount of curtain.
Decide where you will be attaching your curtain rail or track.
If possible, attach the hardware first so that you have a clear guide for how long and deep your drapes should be.
Step 1: Measure the Curtain Rod or Track Width
Measure the usable length of the curtain rail or track that your drapes will cover.
Exclude decorative finials from the measurement, as curtains normally hang along the usable rod or track rather than covering the finials.
For example, if the window is 60in wide, but your curtain rail extends 6in beyond the window on either side.
Your curtain rail width will be:
60in (window) + 6in (left) + 6in (right) = 72in
Therefore, you should base your calculations on covering 72in.
Consider how much space the drapes will take up when fully open. Thicker lined drapes will take up more space either side of a window.
To allow for more light in the room during the day, ensure that there is enough space on the walls for the curtains to pile up.
Step 2: Calculate Curtain Fullness
Fullness refers to how much fabric you are using (flat) in comparison to the width you wish to achieve in your finished drapes.
If you do not have sufficient fullness, your drapes may appear flat and stretched when closed.
As a guide, you can use the below calculation:
Flat Fabric Width = Coverage Width x Fullness
Depending on your design, you may wish to create drapes with the following fullness:
| Fullness | Result | Suitable styles |
|---|---|---|
| 1.5× | Relatively relaxed folds | Some casual rod-pocket and grommet curtains |
| 2× | Full, balanced appearance | Many gathered and taped headings |
| 2.5× | More abundant folds | Certain pencil-pleat and pinch-pleat designs |
Please note that these are just guides. Depending on the hardware and header manufacturer, they may request a specific ratio between fabric and coverage.
For example, if your curtain rail is 72in wide and you wish to create double fullness drapes:
72in x 2 = 144in
Therefore, you need approximately 144in of flat fabric.
For 2 equal size panels, this means you need 72in of flat fabric for each panel.
If you are creating drapes with a fixed header with hand stitched pinch pleats, you will need to do separate calculations for the pleat spacing. In this case, the finished width will not be determined by drawing in the draw strings, but by the pleat and spacing. Therefore, you may need to adjust calculations accordingly.
Use our Curtain Width & Fullness Calculator to check different fullness ratios to make sure you purchase enough fabric.
Step 3: Measure the Finished Curtain Length
Just as important as measuring width is measuring the finished curtain drop.
Measure from the hanging point down to where you want the bottom hem of your drapes to finish.
Depending on your header system, this could be a hanging ring, glider or something else.
Use the hanging reference point specified for your heading and hardware, rather than automatically measuring from the top of the decorative pole.
There are 3 common lengths for floor finishing:
- Floating: The drapes finish just off the floor. Often 1/2in off the floor. This can make it easier to open and clean your drapes.
- Floor-skimming: The bottom hem of the drapes just meets or nearly meets the floor.
- Puddled: Extra fabric from the drapes will be on the ground to create a more dramatic effect.
For regularly opened and closed drapes, it is often most practical to have a little gap between the drapes and floor.
If possible, measure from the left, middle and right of the window to the floor. As the floors and rails may not be completely level.
If the measurements differ, you should account for this when cutting. Do not assume that the window is completely square.
Use our Curtain Length Calculator to calculate the total drop and cut length of your drapes.
Step 4: Allow for Returns and Center Overlap
It is easy to forget to allow for returns and central overlapping.
Returns occur as fabric wraps around the edge of the curtain towards the wall.
Central overlapping allows for two curtain panels to overlap in the centre. This helps prevent a gap.
These can be important to consider if you are using drapery rails or custom pleated drapes.
Check if your hardware system includes returns and overlapping carriers. If you add extra fabric in addition to what is provided by the hardware, you may end up with wider drapes than intended.
How Much Fabric Do You Need to Make Drapery Curtains?
It is good to be precise when calculating fabric amounts as draping fabric can be expensive.
Consider the width of your drapes, numbers of fabric drops, depth of drapes, hem allowances, seams, header detailing and pattern matching.
Calculate Fabric Yardage: A Worked Example
We will create a set of gathered drapes.
| Measurement | Example |
|---|---|
| Rod width | 72 inches |
| Fullness | 2× |
| Finished curtain length | 90 inches |
| Fabric width | 54 inches |
| Number of finished panels | 2 |
Based on the fullness calculation above, we know we need 144in of usable flat fabric.
Now we need to account for the width lost in side hems and seams.
In this example, we are allowing 4in to be lost in each fabric drop, and 1in in total at each of the two joined seams.
If we use 3 drops of 54in fabric we get:
(54-4) x 3 – (1×2) = 148in
This is enough for us.
A good option here would be to allow for 1.5 times the fabric width in each panel to create symmetrical drapes.
The actual usable width will depend on where you place seams and how you finish the edges.
Calculating Fabric Length:
If we want each curtain to be 90in in length, we can allow:
6in for the bottom hem.
4in for top header allowance.
This means we need to cut to:
90in + 6in + 4in = 100in per drop.
With 3 drops:
100in x 3 = 300in
Convert to yards:
300 / 36 = 8.33 yards
Therefore in this example, we need 8 1/3 yards of face fabric before accounting for extra wastage, shrinkage and pattern matching.
Round up to a practical amount to purchase (remember to allow for any contingency).
The allowances given in this example are guidelines only. Based on the header design you choose, you may need different amounts.
Allow for Pattern Repeats
If your fabric has a large repeating pattern, ensure you do not cut each drop to exactly 100in.
For example, if the pattern has a 24in vertical repeat, you may need to cut extra to ensure that the motif is in line at the same height in joined sections.
Follow these steps:
- Find the vertical pattern repeat of your fabric.
- Mark the position of the main motif/s in the top of your drapes.
- Continue to cut your fabric to match this motif in each drop.
- Allow for extra cut length where necessary.
- Calculate total amount of fabric to order.
Pattern matching can greatly increase the quantity of fabric required, particularly for long drapes.
Calculate the Lining Fabric
Lining should be calculated separately as it may be a different size.
For each panel, calculate the width of lining needed (accounting for side construction), and depth (based on finished top position and desired bottom clearance). As a general rule, the bottom hem of the lining fabric should finish above the decorative fabric to hide it from view.
A good guideline is to allow 1in. However this can vary depending on your construction and fabric.
Do not simply buy the same amount of lining as decorative fabric without checking measurements.
Depending on the width of the lining, header detailing and seams, the amount of fabric required may vary.
How to Make Lined Drapery Curtains Step by Step
Measuring and calculating fabric quantities are complete, so it is time to construct your drapes.
Lined, pleated tape heading
This makes two lined drapes. The top edges are finished with pleating tape. The face fabric and lining have separately prepared bottom hems, while the side hems are folded around the lining edges. This is a simple alternative to professional, more complex methods.
The depth of pleating and the method of attachment will depend on the pleating tape you have chosen. Follow the manufacturers instructions.
Step 1: Prepare Your Fabric
Ensure the fabric is not damaged or stained. You may need to pre-wash it if it is washable, depending on the manufacturers instructions. Some decorator fabrics cannot be washed (dry cleaned only) or have finishes which should not be washed.
Do not put valuable materials such as velvet, blackout or special drapery fabrics in a washing machine unless you have checked the care instructions.
- Place the fabric flat. Ensure that the grain is correct.
- If the fabric has a directional print/texture, ensure that the tops of the drapes are in the same direction.
- Press the fabric at a temperature suitable for that fabric.
TIP: If unsure, try the iron on scrap first. Some types of polyesters and coated materials can be damaged using high temperatures or develop shiny patches.
Step 2: Measure, Mark, and Cut the Panels
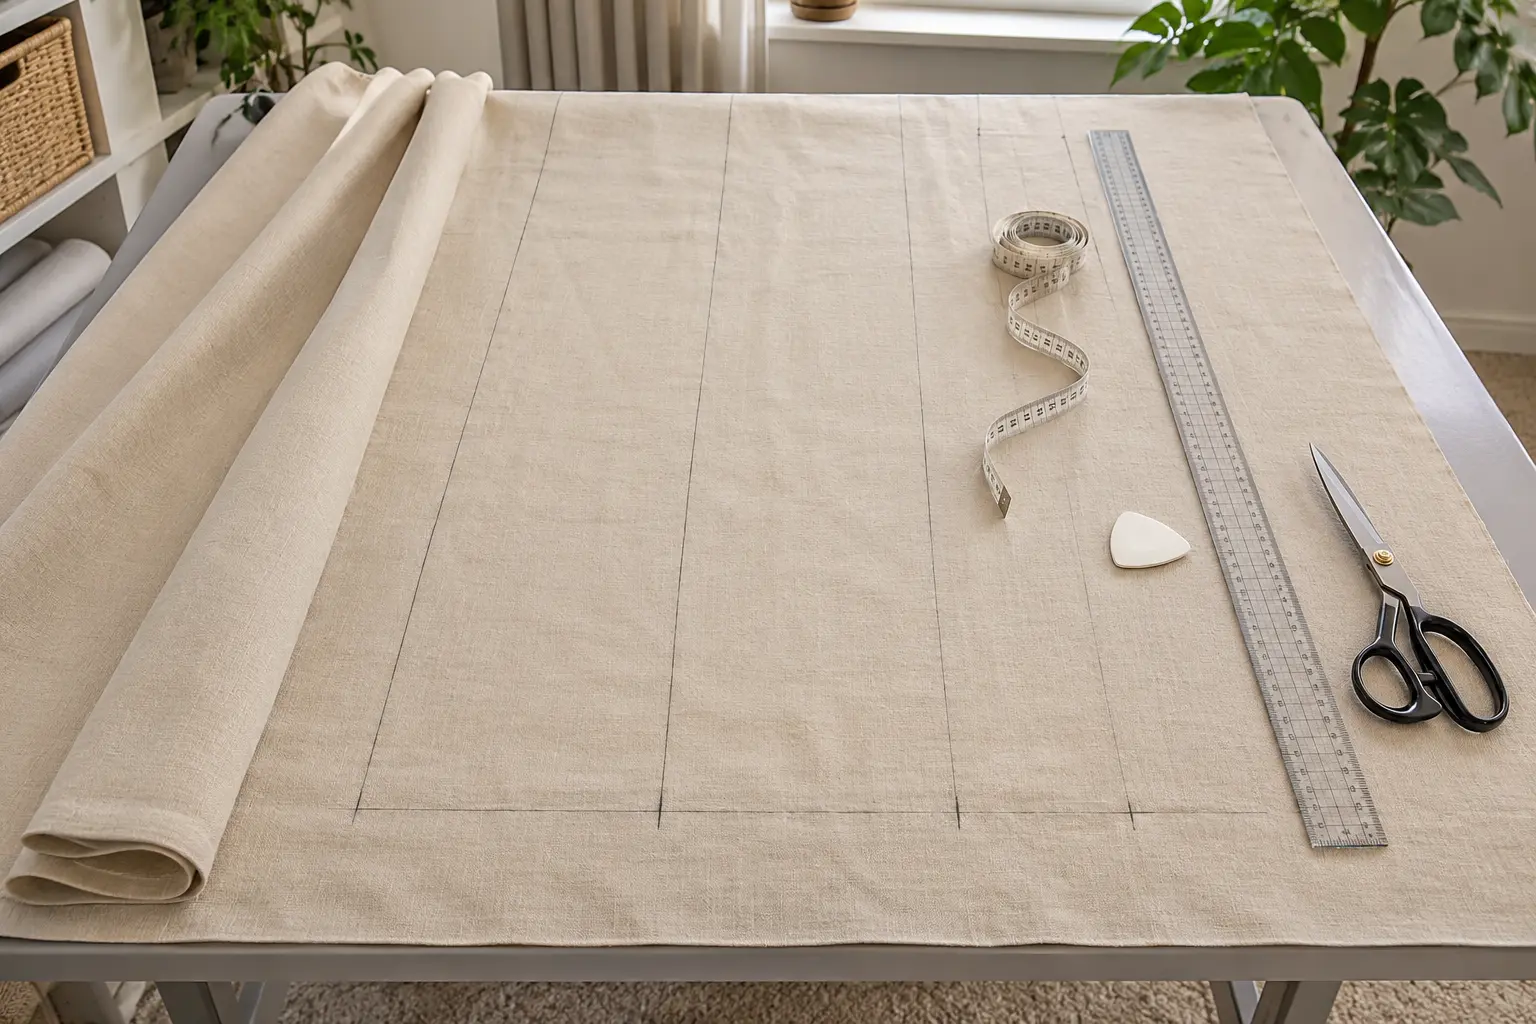
With your measurements, draw a line for cutting on the back of the fabric.
In this example, the total cut length is 100 inches.
- Use a long ruler or square to give straight lines. If the fabric has become skewed, do not solely rely on the selvedge.
- Carefully cut the fabric.
- If joining multiple widths of fabric, organise them so that they have matching patterns and grain.
- You can label the backs of each piece with a small piece of painters tape to avoid confusion.
- Double check that your two drapes are symmetrical, and have enough width to give good results once the side hems have been added.
Step 3: Join Fabric Widths if Needed
If your fabric width does not give enough width for the panel, join extra pieces.
- Place right sides together.
- If you’re using patterned fabric, match the pattern and pin.
- Sew with the correct seam allowance, often half inch.
- Carefully press. Depending on the fabric, and construction method, you may wish to press open.
Avoid stretching the fabric while sewing, as one side may become stretched, causing distortion.
Try to make the joins in the drapes mirror each other in order to make the seams balance in each drape.
Step 4: Sew the Bottom Hem
The bottom hem can greatly affect how your drapes hang.
Medium weight fabrics can benefit from a fairly deep double hem, to add weight.
In this example, a 6 inch double-fold hem allowance is used.
- Fold the bottom edge of the fabric up by 3 inches.
- Press.
- Fold up a further 3 inches.
- Press and pin.
- Sew close to the inner fold.
Sew with straight stitches, or suitable invisible stitch, depending on visibility.
An invisible stitch will result in a neater appearance on suitable materials.
If making drapes from very thick materials, a double hem may be too bulky. Try a different hem.
Before finishing, try the hem on fabric scraps. This will allow you to set your stitch length and tension to avoid distorting the fabric.
Step 5: Prepare the Curtain Lining
Cut the lining to fit the panel, and with the desired construction.
If joining multiple widths of lining, do so as you did the decorative fabric.
Add bottom hems to the lining.
Generally, the bottom hem of the lining should finish a little shorter than the decorative drapes.
In this example, if the decorative drapes finish 1/2 inch from the floor, the lining may finish another inch higher, approximately 1 1/2 inches from the floor.
This means the lining will be hidden, and reduces the chance of the layers pulling.
With wrapped side hems, ensure that the lining is placed so that the decorative fabric can easily be turned over the edges with some ease.
Do not stretch the lining to match the decorative fabric.
Both layers should hang naturally.
Step 6: Attach the Lining and Finish the Side Edges
Place the decorative fabric wrong side up on a large clean surface.
Place the prepared lining over the top, wrong side down, so the wrong sides of both fabrics face each other.
Align the top edges according to your heading.
Ensure that the lining is centred, and the decorative fabric has enough extra fabric on both sides for making side hems.
Work on one side at a time.
- Turn the side edge of the decorative fabric under.
- Wrap the prepared side hem around the lining edge.
- Pin together without stretching.
- Sew with a suitable stitch.
- Repeat on the other side.
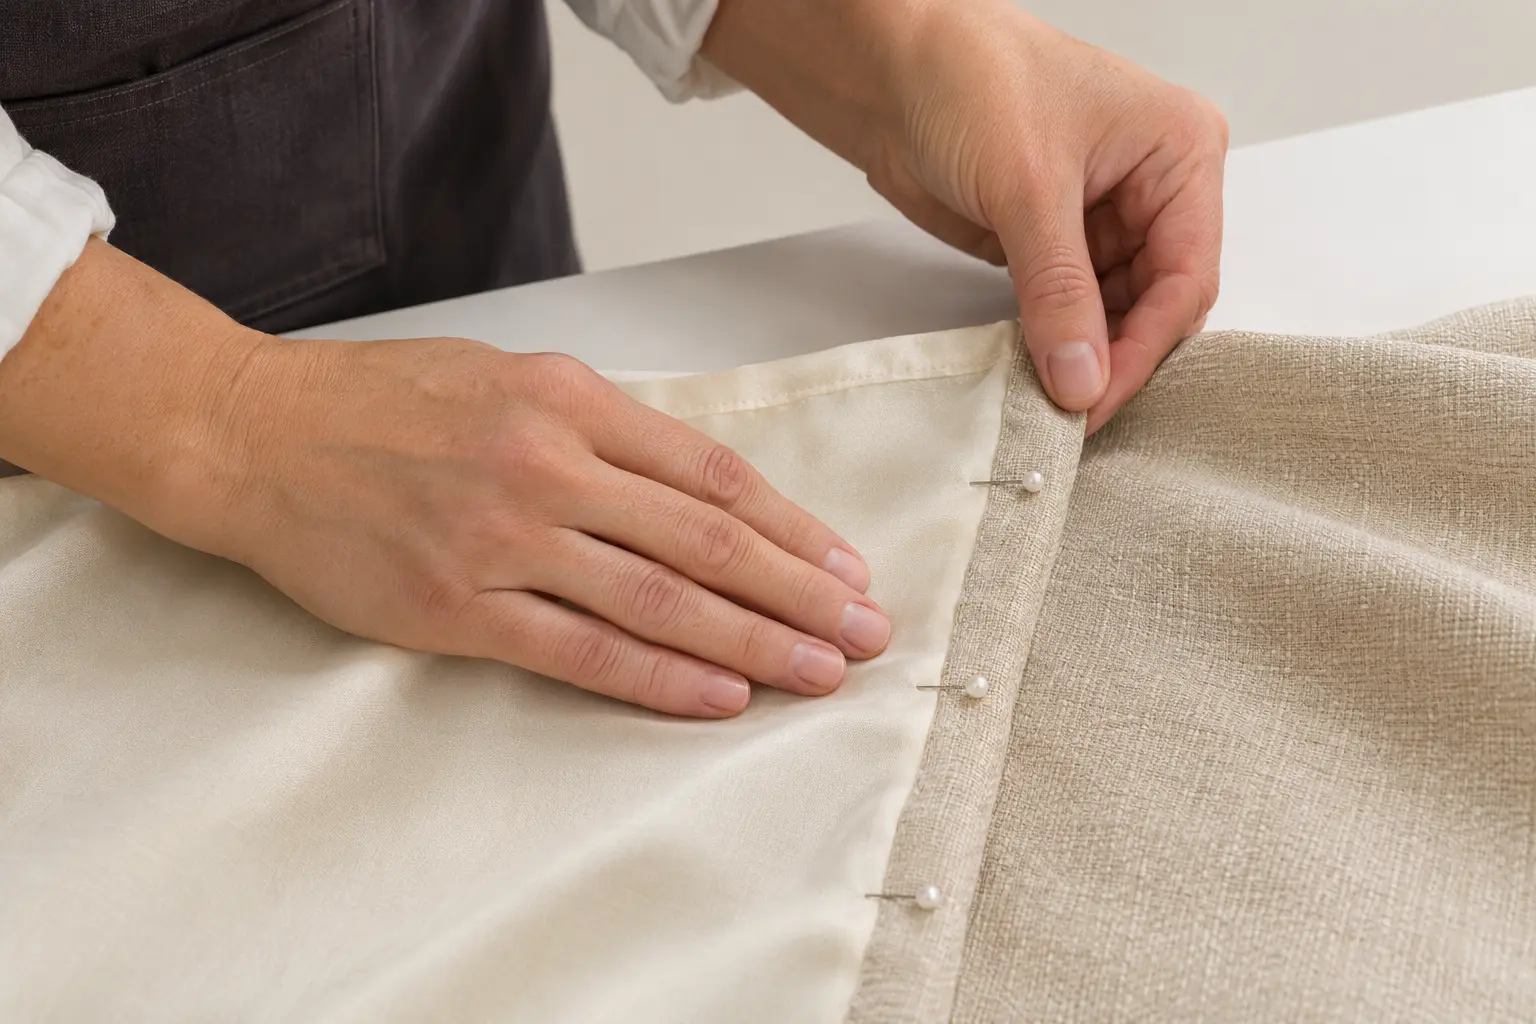
If using thick fabric, reduce bulk at the point of side hems and bottom hems.
This can be achieved using mitered corners or carefully grading the seam allowances.
Once both sides have been pinned, check that the lining is lying flat, and that the decorative fabric is not being pulled in.
A good idea is to pick up the unfinished drapes at the top to see if they hang flat. If twisting occurs, or if the lining is pulling at the sides, make adjustments to how the drape is attached before permanently attaching.
In professional made-to-measure drapes, sometimes the lining is not completely attached to the sides of the drapes. This allows for greater freedom of movement between the layers. This method involves a different construction process.
Step 7: Make the Curtain Heading
The heading of the drapes holds the folds in place and attaches to hardware.
The pleating tape should be a suitable match.
Depending on the type of tape, different effects will be created. Ensure the tape is suitable for making gathered pleats, hook-formed pleats, or other desired effect.
Attach the heading tape by:
- Checking how much extra fabric should be left at the top of the drapes (as per manufacturers instruction).
- Fold and finish the top edge.
- Attach the pleating tape to the back of the heading.
- Ensure that gathering cords, pockets or openings for hooks are easily accessible.
- Pin or clip the tape in place.
- Stitch along indicated lines for that tape.
- Finish ends as instructed.

If using gathers, do not stitch across the gathering cords.
In case of using gathering tape, adjust the cords to give the finished width.
If using a tape for hook pleats, follow specific instructions for the spacing of the hooks.
The headings should have equal widths and hang the same height on both drapes.
Step 8: Attach Curtain Hooks or Rings
Once you have added the heading, add the correct hooks.
Depending on the tape, hooks may be inserted into woven pockets in the heading, or special pleating hooks may be required.
- Ensure the hooks are in the correct position and orientation.
- If using rings, ensure the hooks are attached correctly to the eyes of the rings.
- If using a track, check that the hooks you are using are suitable for the gliders.
Avoid improvising with hardware. Using incorrect hooks can cause uneven drapes or undue stress on the fabric.
Step 9: Hang the Drapery Panels
Carefully place the drapes onto the pole/track.
Support the fabric and attach each hook in order, working along the pole or track.
Once both drapes are hung, pull them fully closed.
Check:
- Are the drapes coming together centrally?
- Is the bottom hem at the correct length?
- Are the drapes moving smoothly?
- Are the sides hanging straight?
- Is the lining hidden?
- Is the fabric gathering as expected?
If the drapes appear uneven, check that the hooks are in the correct position and that the hardware is level. This does not necessarily mean there was an error in cutting.
Depending on the fabric, it may settle slightly once hung. Don’t rush into making large changes.
Step 10: Steam and Train the Drapery Folds
This is an easy step to miss, but it makes a great difference.
Once made, drapes can be quite stiff and may not have a nice shape. Work the drapes into the desired shape.
If possible, gently steam the fabric to relax any wrinkling.
Be careful with steamers and follow care instructions for the fabric.
Tie the pleats loosely with wide, soft fabric. Do not tie too tightly to cause flattening.
Once the fabric has relaxed, undo the ties. Check how the drapes look.
The drapes should have a nicer, more uniform drape.
How to Make Different Types of Drapery Curtains
While this method provides a neat lined drape with pleating tape, you may wish to make different variations.
Depending on the style of heading, preparation and finishing will differ.
1. Simple Rod-Pocket Drapes
Rod pocket drapes are very simple to make.
Rather than using hooks or pleating tape, a pocket is made at the top of the drape.
The pole is inserted directly into the pocket.
- Cut the fabric to size (including allowances).
- Add side and bottom hems.
- Fold the top edge to create a suitable sized pocket.
- Press and sew.
- Insert pole.
Ensure that the pocket allows the pole to fit comfortably.
As rod pocket drapes are often used for decorative drapes, or drapes that will not be moved much, they are often best suited to these purposes.
2. Pencil-Pleat Drapes
Pencil pleat drapes have neat small pleats along the top edge.
This is usually achieved using specialised gathering tape.
Once the body of the drape has been made, attach the pencil pleat tape to the back of the heading.
- Secure the cords at one end.
- Pull from the other end to gather the drape to the desired finished width.
- Evenly distribute the gathers, then tie and secure the cords.
Do not cut off any excess gathering cords, as you may need to ease the pleats for cleaning, or adjusting.
3. Pinch-Pleat Drapes
Pinch pleat drapes have a smart tailored look.
Rather than continuous gathering, the fabric has clearly defined pleats, with areas of flat fabric in between. Double or triple pinch pleats may be present, depending on design.
Traditionally, these are made by hand. They are made by:
- Calculating the finished width of the drapes.
- Calculating the number of pleats and gaps.
- Creating a strong header (often with buckram) in the top of the drape.
- Marking where each pleat should go.
- Folding and securing the pleats.
- Stitching each set of pleats.
- Attaching suitable hooks.
Most importantly, the placement of the pleats needs to be planned.
If the pleats are unevenly marked, even perfectly stitched drapes may look uneven.
The calculation for gathering tape may not be directly applicable to hand made pinch pleats. As different numbers, sizes and spacing of pleats are required, the amount of fabric required will vary.
4. Grommet Drapes
Metal or plastic rings are attached to reinforced holes in the top area of the drape.
The pole goes through the grommets and creates broad, regular folds.
- Prepare the drape with a reinforced heading, as per manufacturers instructions.
- Carefully measure and mark where to cut the holes.
- Check how many grommets you need in total, and where they should be spaced from the edges.
To create a symmetrical effect in a pair of drapes, it is common to have an even number of grommets on each drape.
- Use a correct cutting template and tools.
Do not cut the holes any larger than instructed by the manufacturer.
5. Ripple-Fold Drapes
Rippled fold drapes create even ripples along a track.
This effect is created using a co-ordinated combination of heading tape, snap carriers and track fittings.
How rippled and full the drapes are will depend on what system is used.
To create proper rippled fold drapes, it is not reliable to simply attach pleating tape to a regular pole.
Choose the track and heading components you wish to use, and make measurements as per the instructions.
These drapes can look very stylish in modern settings, but care must be taken to plan the hardware correctly.
Professional Techniques for Better-Looking DIY Drapes
Making small changes to your drapes can make a big impact to make them look professional. Consider the following, depending on your fabric and heading type.
Use Buckram for Structured Pleats
Buckram is a stiffening material used in some heading styles.
It gives strength to the top edge and helps shaped pleats hold their shape.
It is especially useful in hand made pinch pleat drapes.
However, it is not required in all heading styles. Some pleating tapes will provide sufficient stiffness.
Choose the right material to suit the weight of the drapes, and type of pleats.
Finish the Corners Neatly
The corners at the base of drapes can contain a lot of folded layers of fabric.
In thick materials, this can create a bulge.
A mitered corner distributes the fabric nicely.
Fold and mark the intersecting hems. Trim or fold as per your desired construction. Press.
If unfamiliar with this technique, always try it on spare fabric first.
Add Drapery Weights When Appropriate
Small weights can help certain drapes hang neater. They can be useful in the bottom corners of drapes, if the fabric is puffing out or if the sides are not falling neatly.
Ensure that weights are securely enclosed within suitable hems/pockets.
Ensure that the weights are not loose or accessible, particularly if children may be handling the drapes.
Not all drapes require weights. If too much weight is added to lightweight drapes, or inappropriate hardware, it may cause distortion.
Press as You Sew
A simple change to make drapes look more professional is to iron after each stage.
Iron the seams, hems and folds carefully.
Do not wait until the drapes are fully made.
Once many layers have been sewn together, it can be very difficult to get rid of creases.
If making drapes from delicate or textured fabrics, use a pressing cloth with an appropriate heat.
Do not iron directly on to velvets or blackout materials.
Can You Make Drapery Curtains Without Sewing?
Simple decorative drapes can be made using no-sew hemming tape, or suitable adhesives. However, there are limitations to this method.
These methods are best suited to light/medium weight drapes with simple hems.
Method 1: Fusible Hemming Tape
Hemming tape fuses fabric together when heated.
- Measure and cut the fabric.
- Fold over the hem to the desired depth.
- Insert the hemming tape.
- Heat as per manufacturers instructions for the tape and fabric.
- Leave to cool.
- Check that the hem is secure.
Test on a small piece of fabric first.
This method may not be suitable for fabrics which can not withstand the required heat.
Method 2: Fabric Adhesive
Some types of fabric glue can be used to create simple hems.
Ensure that you use a glue suitable for the fabric type. Follow the curing instructions.
Depending on the glue, markings may be left on the fabric, stiffening may occur, or it may show through thin fabric.
If using expensive drapery fabric, test the glue on a small area first.
Heavy, lined or structured drapes are generally better made with sewn methods as they will be stronger, easier to customise and more suitable for long term use.
Common Drapery-Making Mistakes and How to Fix Them
Despite careful construction, problems may arise. It is important to determine the cause of the issue before unpicking or cutting fabric.
| Problem | Possible cause | How to fix it |
|---|---|---|
| Curtains are too short | Incorrect hanging-point measurement or insufficient length allowance | Check the hardware position and remaining hem allowance before altering |
| Bottom hem looks uneven | Uneven floor, stretching, or inaccurate cutting | Check the rod level and remeasure while hanging |
| Panels don’t close completely | Insufficient finished coverage width | Check the center overlap, returns, and heading width |
| Lining pulls the face fabric | Incorrect lining dimensions or attachment tension | Release and readjust the lining |
| Side seams pucker | Incorrect tension, needle, or fabric handling | Test stitch settings and reduce fabric pulling |
| Pleats aren’t symmetrical | Uneven gathering or hook spacing | Recheck the tape and distribute the folds |
| Fabric twists when hanging | Fabric cut off grain or layers attached under tension | Check grain alignment and release restrictive seams |
| Curtains look bulky | Too much fabric or unsuitable heading | Review fullness and heading compatibility |
| Pattern doesn’t align | Repeat wasn’t planned before cutting | Correct where seam allowance permits; otherwise recutting may be necessary |
What If Your Curtains Are Too Long or Too Short?
If your drapes Are Too Long, first check that the pole/track is level, and that you can adjust the position of the hooks. If this does not solve the issue, measure where you would like the hem to be while the drapes are hanging. Remove from the pole and adjust the length of the hem.
If they are Too Short, it can be trickier to fix.
If there is enough fabric remaining, you may be able to let some of the bottom hem out. Alternatively, you may be able to add a deliberate contrasting border. It may also be possible to adjust the position of the hardware, as long as it doesn’t cause issues with fitting or clearances.
Only cut extra fabric out if you have carefully checked the measurements.
What If Your Curtains Don’t Hang Straight?
Check if the lining is pulling in at the sides.
Look for stretched seams, unequal hook placement, or fabric cut incorrectly on the grain.
While allowing the drapes to hang may help small creases, if the measurements or seams are fundamentally incorrect, it will not improve the appearance.
How Much Does It Cost to Make Your Own Drapery Curtains?
The cost of making drapes will depend on the fabric, size of drapes, use of lining, hardware and method of construction. Simple unlined cotton drapes will generally cost less than lined velvet pinch pleat drapes. Calculate the cost based on the actual material prices.
| Expense | How to estimate it |
|---|---|
| Decorative fabric | Required yards × price per yard |
| Curtain lining | Required lining yards × price per yard |
| Pleater tape or buckram | Required heading length × unit price |
| Thread and sewing supplies | Quantity needed for the project |
| Curtain hooks or rings | Number required × unit price |
| Curtain rod or track | Actual hardware purchase price |
| Extra cutting allowance | Additional fabric needed for matching or waste |
For example, 9 yards of decorative fabric costing $18 per yard:
9 × $18 = $162
9 yards of lining, costing $6 per yard:
$6 × 9 = $54
Total cost of fabric and lining:
$162 + $54 = $216
You will also need to include the cost of heading materials, hardware and other items.
These prices are just examples.