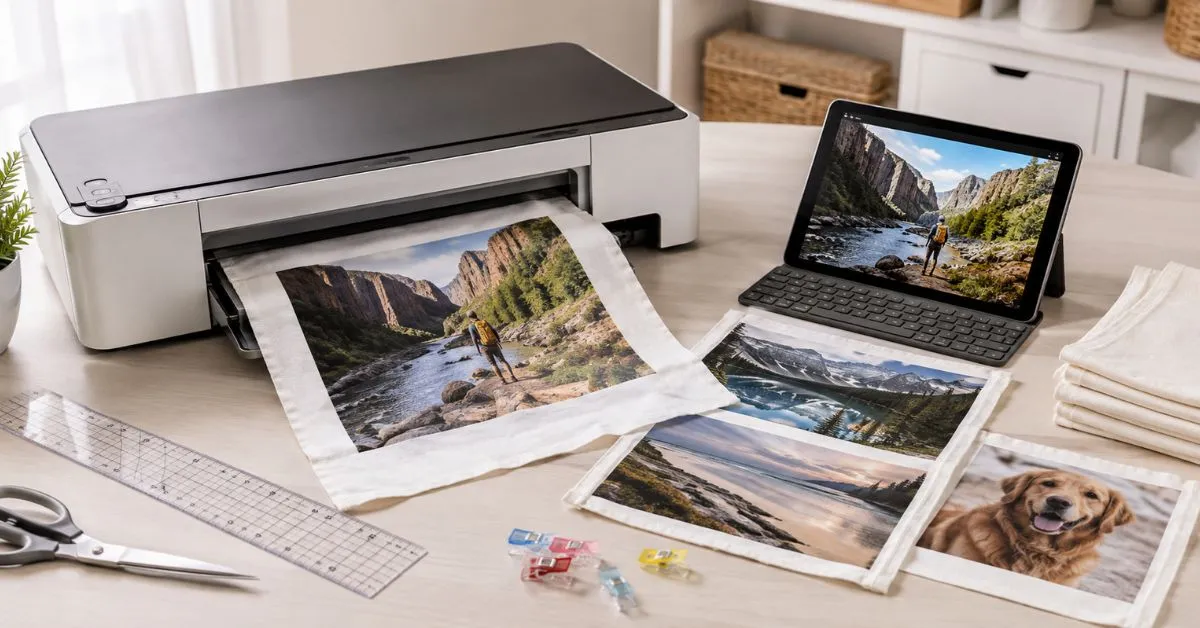

Printing fabric allows you to transform your digital photos into personalized quilts, clothing, throw pillows, tote bags, canvas art, and many other creative projects. Depending on the materials you want to print on, the tools you already have at home, and the level of permanence and quality you desire, there are several methods to choose from.
For personal use, inkjet printable fabric sheets and iron-on transfer paper are the easiest options. If you want bright, durable images on polyester blends and sportswear, sublimation is the way to go. For producing multiple prints on garments, direct-to-garment (DTG) and direct-to-film (DTF) methods are the most convenient. In any case, you need to prepare the image and carefully follow the manufacturer’s instructions when printing on fabric.
Can You Print a Photo Directly on Fabric?
You can print a photo directly on fabric, but you cannot simply insert a piece of loose fabric into your home printer. Ordinary fabric tends to stick together, slip, pucker, or damage printer rollers.
To print on fabric at home, use commercially available inkjet-printable sheets or attach cotton fabric to freezer paper. Both methods help prevent the material from curling during the printing process. When using sheets with a paper backing, you will need to iron off the paper once the ink has dried.
How to Print Photos on Fabric: 6 Best Methods
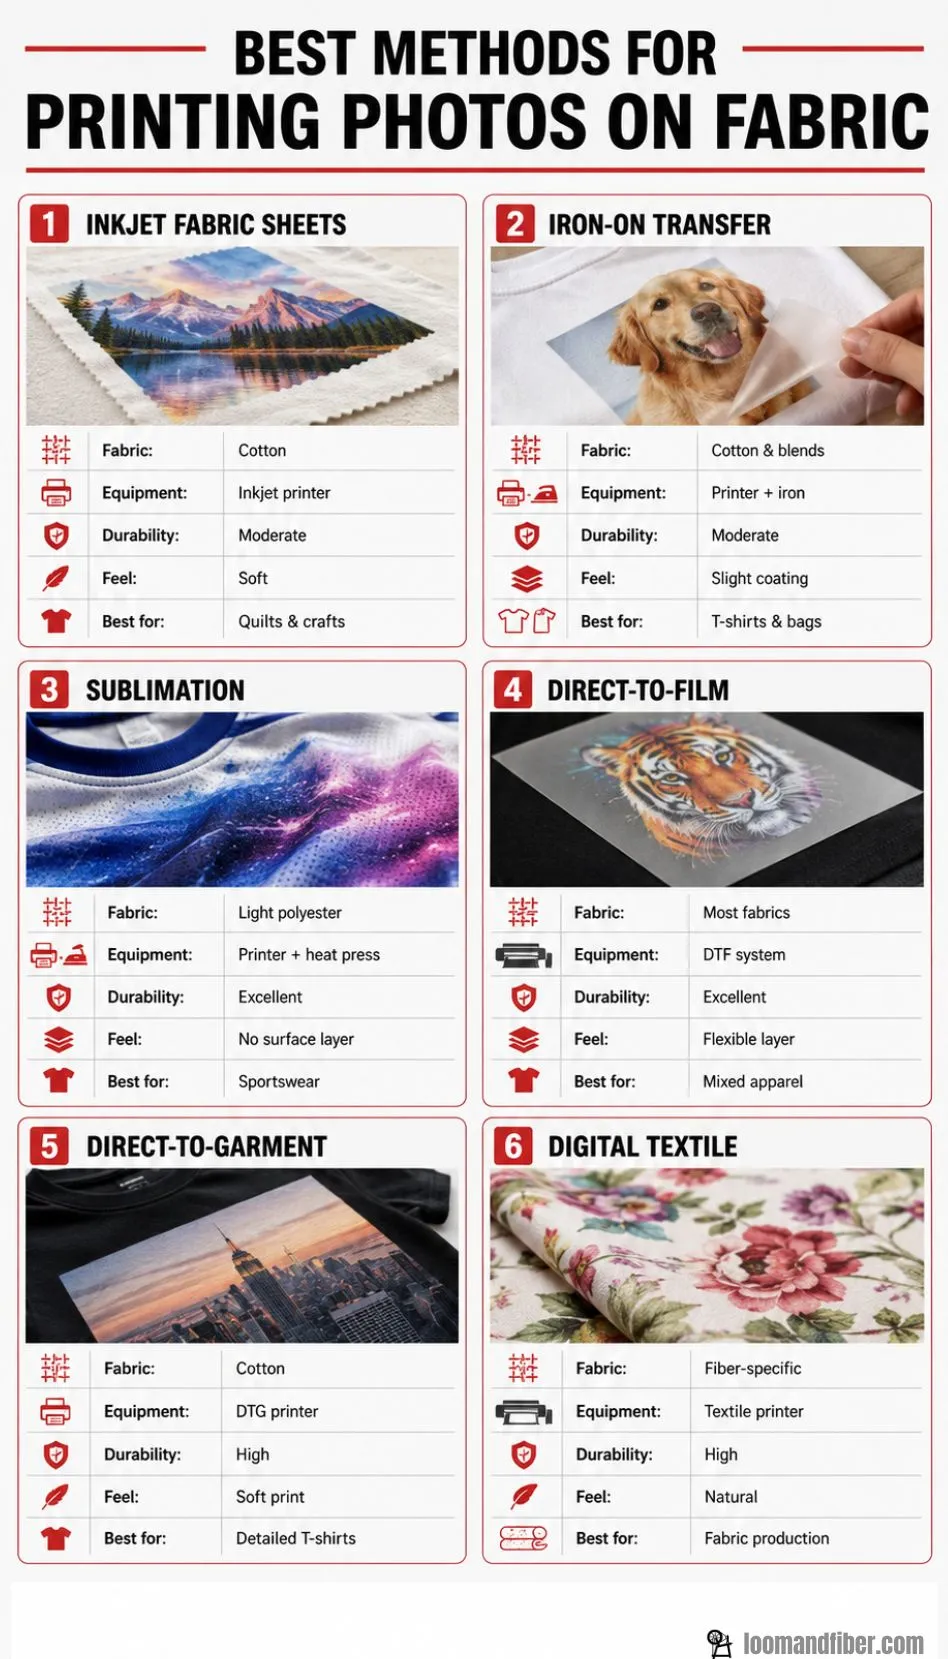
There are several ways to transfer an image onto fabric. Each method has its own advantages and challenges. The table below provides a brief overview of the most accessible options.
| Printing method | Best fabric | Equipment needed | Durability | Best use |
|---|---|---|---|---|
| Printable fabric sheets | Cotton and cotton blends | Inkjet printer | Moderate | Quilts, crafts and decorative panels |
| Transfer paper | Cotton, polyester and blends | Inkjet or laser printer and iron | Moderate | T-shirts, bags and home projects |
| Sublimation | White or light polyester | Sublimation printer and heat press | Excellent | Sportswear and performance apparel |
| Direct-to-garment | Mainly cotton | DTG printer | Good to excellent | Detailed custom clothing |
| Direct-to-film | Cotton, polyester and blends | DTF equipment and heat press | Excellent | Apparel and mixed-fabric products |
| Screen printing | Most suitable textiles | Screens and printing equipment | Excellent | Large production quantities |
How to Print Photos on Fabric with an Inkjet Printer
Inkjet-printable fabric sheets provide an easy solution to the question, “How can I print photos on fabric?” They are specially treated and dimensionally stable, which means they do not shrink or stretch when ink is applied. To print photos on fabric using this method, you need:
Materials Needed:
- A photo you want to print (the best photo for printing is 300 pixels per inch)
- An inkjet printer
- Commercially available printable fabric sheets
- Photo editing software
- Scissors or rotary cutter
- An iron, if needed
- Clean cotton cloth or parchment paper
- Mild detergent for washing the finished product
Most inkjet-printable sheets only work with inkjet printers. Check the manufacturer’s instructions before trying to use the same fabric sheets in a laser printer.
Prepare the Picture for Printing
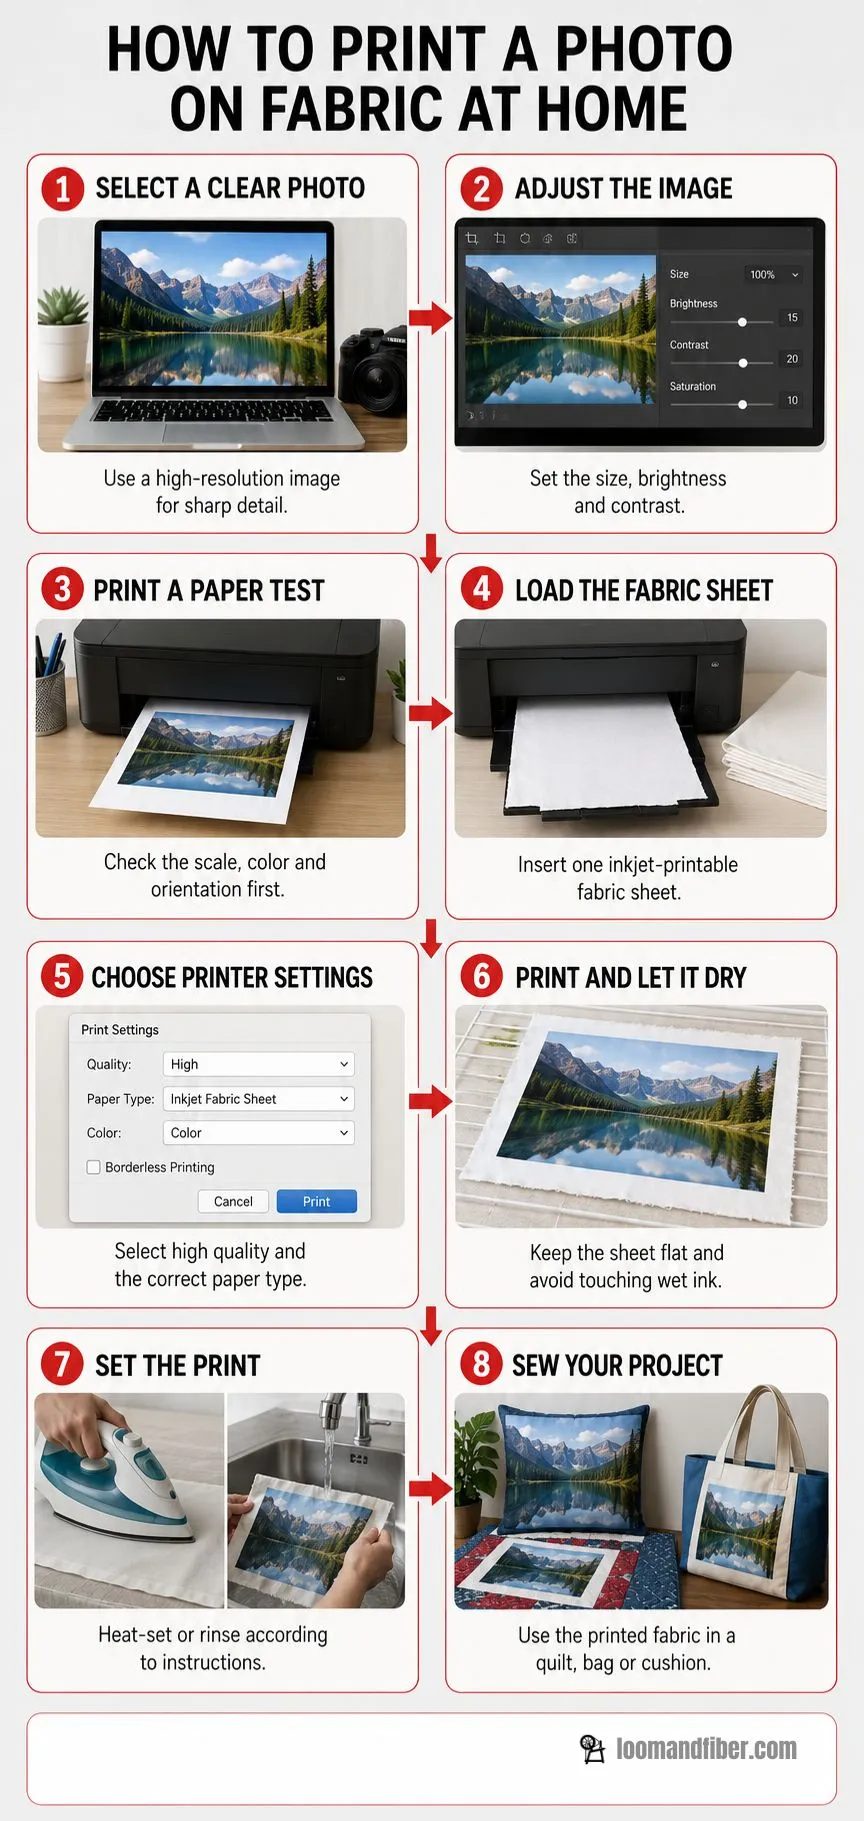
When selecting the image for printing on fabric, remember that anything smaller than a standard 8 x 10 photo may look blurry or pixelated. For the best photo print on fabric, scale the image to about 300 pixels per inch. Remove unwanted background objects, brighten the composition if needed, and increase the overall contrast of the photo. Textured surface of fabric usually absorbs inks more intensively than glossy paper, so expect that photos printed on fabric may look a bit underexposed.
If your image includes words or numbers, or a directional graphic (e.g., a logo), check if you need to mirror it for the specific type of fabric you are printing on. Most sheets that require ironing have mirrored print areas, while direct-to-fabric sheets do not.
Test the Picture
Before you start printing, try printing the image on regular paper to ensure that the composition, margins, colors, and sizing look good. Use this printed test sample to visualize where the image will appear on the fabric.
Load the Fabric Sheet into the Printer
Make sure you put the correct side of the printable sheet into the printer. In most cases, the printing side is the fabric, not the paper surface. To identify the printable side, use a marker to mark one edge of a regular sheet of paper, then send it to the printer. Depending on the printer settings, the mark will appear on one of the sides of the printed sample.
Feed the fabric sheet into the printer one at a time. Remove any other paper from the printer tray and make sure the fabric sheet is fed without folds.
Set Printer Options
Select the highest possible print quality to ensure that the image appears crisp and sharp on fabric. If your printer has a matte paper, heavy paper, or special fabric print mode, use it to make the printed image more visible. Avoid printing borderless photos unless the manufacturer explicitly states that the sheets can handle this option.
Print and Let It Dry
Print your favorite photo on fabric and wait for it to dry. Avoid touching the printed side of the fabric, as the ink may smudge or streak. The manufacturer will indicate how long you should wait before moving to the next step. In most cases, it is enough to wait for a few minutes or even a few seconds.
Set and Rinse the Fabric Print
Depending on the brand of the printable sheets, you may need to set the image by applying heat or rinse the fabric in warm water. Some products need to be ironed at a specific temperature for a certain amount of time before being washed in a machine. Always follow the care instructions provided by the manufacturer to avoid damaging the printed image.
How to Print Photos on Fabric Using Freezer Paper
You can use freezer paper to print fabric pictures at home, but this method requires more effort than using commercially available sheets. In addition, using this method carries a higher risk of damaging the printer motor when feeding the paper.
Prepare the Cotton
When selecting cotton fabric for printing on fabric, prioritize light-colored, tightly woven, and smooth materials. Wash the fabric in warm water without fabric softeners to remove any finish or lubricants that might resist ink absorption. Dry it and iron it while it is still damp to ensure that it is absolutely flat and free of wrinkles.
Attach the Freezer Paper to Fabric
Cut a piece of cotton and freezer paper slightly bigger than the desired size for your printed photo. Place the shiny side of the paper against the fabric. Then, press the two materials together with an iron on a dry setting until the paper adheres to the fabric.
Cut out the resulting sheet to the desired size using standard paper margins. Remember to remove any loose threads along the edges so that they do not clog the printer.
Print the Photograph
Place one prepared sheet of freezer paper+fabric into an inkjet printer and print the picture using high-quality mode. Watch the printing process to make sure that the paper is not feeding incorrectly. Wait until the print is completely dry before you remove the paper from the printer.
Depending on the type of ink you used, you may need to apply additional heat setting using a commercial fabric fixative or ironing. This is a more complex technology, so printing on cotton using these methods is better suited for making decorative items. The print quality may also vary significantly, and the image may not be resistant to frequent washing.
How to Print Photos on Fabric Using Transfer Paper: Step-by-Step Instructions
Iron-on transfer paper prints images on fabric by transferring them from a special paper sheet to the desired surface. First, you need to decide what type of transfer paper you want to use.
- Light-fabric transfer paper is suitable for light-colored materials
- Dark-fabric transfer paper has a white coating to ensure the print is visible.
In any case, you need to choose the paper that is compatible with your printer (inkjet vs. laser).
Print the Picture
Make sure to read the manufacturer’s instructions before sending your image to the printer. Most of the time, light-fabric transfer paper needs a mirrored image printed on it because the picture is transferred to fabric from the front side. At the same time, dark-fabric transfer paper is usually printed right-side up. As always, print your image on regular paper to check the final appearance before proceeding to the next step.
Trim the Image
Use scissors to cut out the image and any unnecessary white space around it. The paper border should be as narrow as possible since the white coating on transfer paper will show through if not removed. Rounded edges are less likely to lift than square ones.
Apply Heat to Set the Image
Lay out the washed and dried fabric on a firm and heat-resistant board. Place the printed transfer paper on top of it, and press the two materials together with a household iron at the appropriate temperature.
Follow the manufacturer’s instructions carefully and apply even pressure across the surface. When you peel the transfer paper from the fabric, make sure to do it slowly and at the right temperature, depending on whether you are using a cold, warm, or hot peel.
A heat press can be used for more accurate results as it ensures even pressure and temperature throughout the transfer process.
Sublimation Printing for High-Quality Photos
Sublimation is one of the modern ways of transferring high-resolution full-color images on polyester material. The process involves using heat to change the special sublimation ink into gas. The gas then combines with the polyester fibers.
This method is appropriate when there is a need for an image that will not crack or peel off after being printed. The print cannot be seen as a separate layer on the surface of the textile. Moreover, the fabric remains soft and breathable.
Such prints are used on these types of materials:
- white or light-colored fabric
- polyester or polyester-rich textiles
- sports jerseys
- performance shirts
- flags and banners
- promotional textile items
Sublimation is not suitable for common cotton materials without special polymer coating or special transfer inks. Another limitation of sublimation printing is that white ink is not included in all sublimation inks. Therefore, the color of the fabric will affect the color of the final image.
Professional Fabric Photo-Printing Methods
Home methods are appropriate for beginners and small tasks, but professional machines ensure better quality and longevity.
Direct-to-Garment Printing
This method spray-textures textile ink directly on the fabric. With DTG, it is possible to print high-resolution images, photographs, and large-scale color gradients with precision. Garments made of cotton or cotton blends are the best choice for DTG. Dark t-shirts need to be treated with white ink before DTG printing to ensure good color vibrancy. Curing makes the print more wash-resistant.
Direct-to-Film Printing
With DTF printing technology, an image is printed on a special film, covered with special powder, cured, and transferred to a garment with a heat press. This method is good for cotton, polyester, and mixed fabrics. It can be used on dark clothes, and the print is quite colorful and precise, although the surface of the transferred area is more textured than with sublimation.
Digital Textile Printing
Digital textile printers print fabric rolls using reactive, pigment, acid, or disperse inks. Each of these inks is suitable for different kinds of fibers:
- reactive dyes are used for cellulose fabrics like cotton or viscose
- acid dyes are used for protein fabrics like silk or wool
- disperse dyes are primarily used for synthetic fibers like polyester
- pigment inks can be used on a variety of fibers, with an appropriate pretreatment
- This method is primarily intended for industrial use because it is complex and not cost-effective for household use.
Choosing the Right Fabric
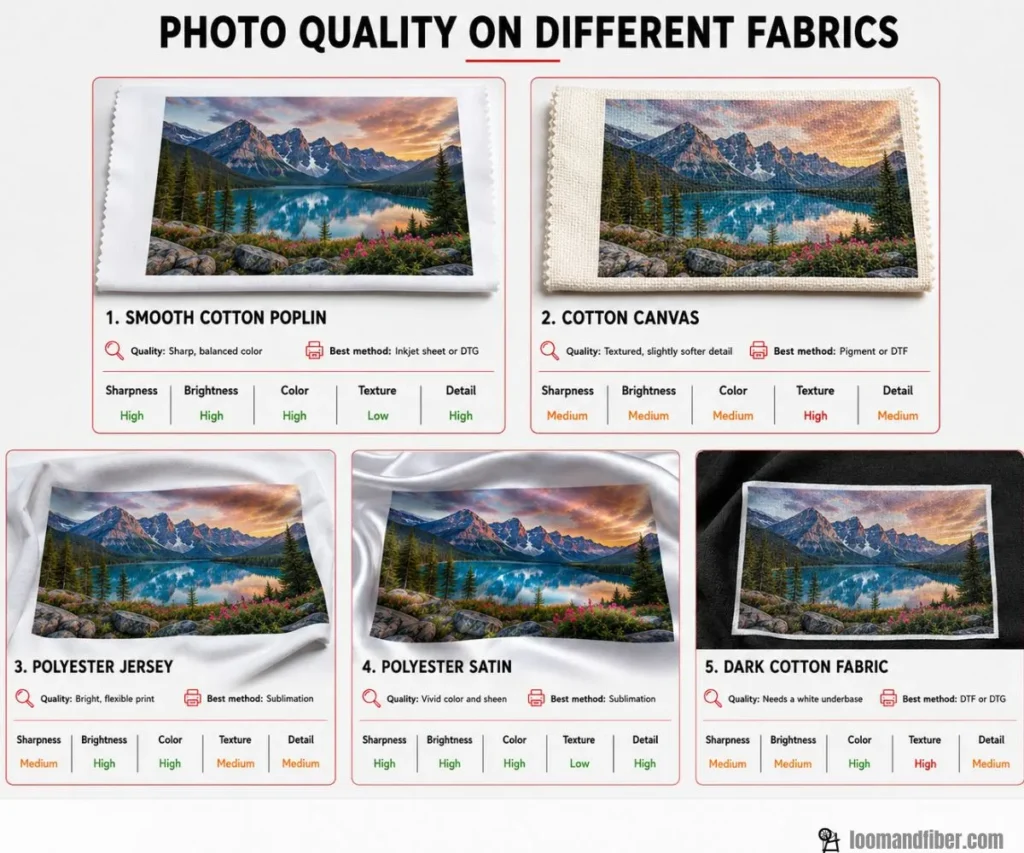
The material, weave, color, and texture of the fabric also affect photo-printing. A tightly woven, smooth fabric will ensure good quality prints with fine details, while a loosely woven and rough fabric is more suitable for casual use. Ideally, you should also choose a white or light-colored textile because, in most cases, fabric printers use the color of the fabric as the white or off-white color.
The following materials are suitable for use with different printing methods:
- cotton poplin, for quilting and decorating purposes
- cotton canvas, for making bags or painting on fabric
- polyester jersey, for sublimating sports t-shirts, tank tops, or skirts
- polyester satin, for photo-printing bright decorative prints
- cotton t-shirts, for creating transfers or DTG printing
- polyester-cotton mix, for DTF printing transfers
Try to avoid using fabrics with a rough or uneven surface for printing, as well as very stretchy or loosely woven ones, if you need a picture with fine details.
How to Improve Photo-Print Quality
Besides, considering the recommended practices and avoiding some mistakes is essential in learning how to print photos on fabric. Several essential tricks can help you achieve the required print quality.
Use a High-Resolution File
Use a high-resolution photo file and avoid using pictures in low resolution from social networks because they may be smaller than the actual size. A picture with more pixels will have a better print quality.
Adjust the Image for Fabric
A print on fabric usually looks less contrasted than a picture printed on paper. If the test print seems too pale, try adjusting the brightness and contrast. However, it is critical not to overdo with the editing of the photo, because some elements will be lost due to excessive lightness or lack of contrast: for example, skin on people or shadows in the picture.
Print a Small Sample
Print a small sample of the image on the fabric to evaluate how it looks on the material. A test print allows you to see how the colors, image clarity, and material texture look in the print compared to the monitor. It also helps determine if the fabric is prone to wrinkling or fading after washing.
Use the Correct Color Profile
The professional printer may recommend using a particular ICC color profile for the selected printer, inks, and fabric type. The right profile might be crucial to achieve a good print quality, although the color of the print on fabric will differ from the color seen on the computer screen.
Pretreat When Necessary
Pretreatment is crucial to achieve good print quality if needed. Commercial printable sheets usually have the required treatment, but if you use untreated fabric, select the appropriate texturing agent for your printer.
Common Mistakes to Avoid
Many mistakes during the printing process can lead to unsuccessful results. Some common mistakes are as follows:
- printing a low-resolution photograph
- using the wrong transfer paper for the printer
- not mirroring an image when needed
- printing on a wrinkled or loose fabric
- using the wrong temperature
- sliding the iron when you should be pressing it firmly
- washing the fabric before the ink or transfer has dried
- using fabric softener before printing
- printing white ink on a dark fabric
- not printing a sample or preview
- feeding unsupported loose fabric into a printer
- expecting regular ink to resist washing
How to Wash Photo-Printed Fabric
Do not wash the printed fabric before the curing period recommended by the manufacturer has expired. Some transfers need at least 24 hours before they can be washed.
For better durability:
- Do not iron directly over a surface transfer
- Turn garments inside out
- Wash in cool or warm water
- Use a mild detergent
- Select a gentle wash cycle
- Avoid bleach
- Avoid aggressive stain removers
- Air-dry when possible
Sublimated polyester generally withstands washing better than a standard home printer because sublimation printing permanently infuses the fabric with ink.
Which Method Should You Choose?
Use printable fabric sheets if you want a simple photo-printed fabric for quilting, labels, and other home improvement crafts, as well as for making memory books and sewing clothes for special occasions.
Choose transfer paper if you want to print on fabric with regular inkjet printers and need cheap custom T-shirts, shopping bags, cushion covers, and similar gifts.
Go for sublimation printing if you want bright and soft photo prints on white or light t-shirts, dresses, skirts, or men’s t-shirts.
Use direct-to-film printing if you need to print on different types of fabrics, including dark ones, and can afford the higher expenses of a professional printing method. DTG is great for photo printing on cotton clothing.
Use a textile printer to print fabric if you have a substantial supply of fabric. The professional will choose the right pretreatment, inks, printing methods, and color profiles to ensure the required print quality and long-lasting results.
Conclusion-
Learning how to print photos on fabric is inseparable from the discussion of the relationship between printing methods and the characteristics of the textile. Various types of fabric printable sheets, transfer papers, and sublimation papers are suitable for household use, while professional textile printing ensures consistent high print quality and long-lasting results. Choosing the right method and materials for the project is essential, but it is vital to make a test print to see how the image looks on the specific fabric. Doing so helps avoid wasting fabric while at the same time achieving the best possible image quality and print longevity.
Read More>> Can you Screen Print on Polyester?
FAQs
You can print on a regular fabric with an inkjet printer, provided that you have the appropriate printable sheets or transfer paper. However, do not feed regular fabric into the printer mechanism because it can be damaged.
It depends on the type of ink and the fabric, as well as the additional steps that are taken. Commercial printable sheets usually give more reliable results than home use sheets, but such prints usually do not withstand the wash as well as sublimation or professional textile printing.
You should only mirror the image if the directions for the transfer paper you are using say so. Usually, light fabric iron-on paper needs to be mirrored, while sheets for direct printing do not. Always remember to mirror if there are letters in the image you are printing.
Light cotton fabric is best suited for printing with printable sheets, while white polyester is perfect for sublimation printing. It all depends on the printing method you have chosen.
Printing on dark fabric is entirely possible, but you have to choose the right method and materials for it. For example, dark fabric transfer paper, or such methods as DTF or DTG printing with white ink are good options. Regular inkjet printing on dark fabric cannot reproduce light colors accurately.
The most durable method is sublimation printing for polyester fabrics. Other professional methods, such as DTF, DTG, and digital textile printing, also allow you to create highly durable prints with the right care.