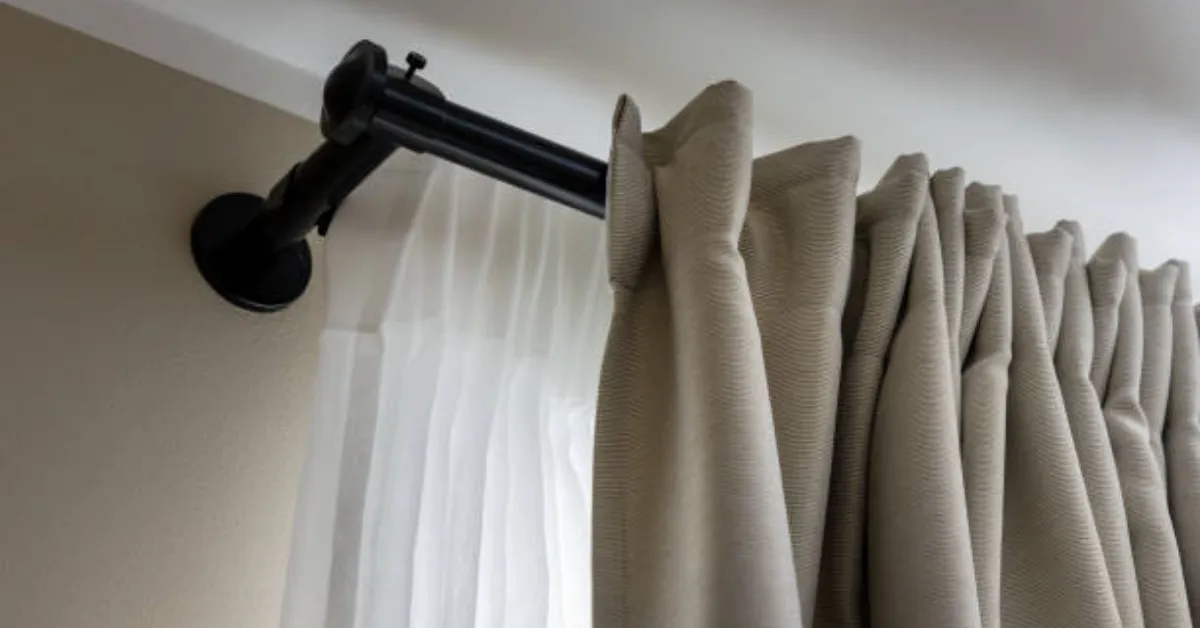

Layering your curtains is a great way to create versatility. Hang your sheer curtain on your nearest rod/track to the window. Then hang your opaque/blackout curtain on another rod/track (further away from the window). Measure each curtain separately, allowing enough room for your fabric to move and ensuring that when your curtains are closed they will fully cover the window.
Depending on the hardware you choose you will be able to create versatile spaces throughout your day. If you have the sheer curtains closed you will get some filtered light, leaving both layers open you’ll have full visibility and having the opaque curtains closed will give you more privacy. The type of hardware you use and how you measure will affect how your curtains will look.
1. Decide What You Want From Your Layered Curtains
Think about what you want to achieve with your window. If you’re using them for your bedroom you might want to keep things dark at night but have natural light in the morning. Or in your living room facing a street you might want more privacy but not feel as enclosed.
| What you need | Suggested arrangement | What to check |
|---|---|---|
| Soft daylight and nighttime privacy | Sheers behind opaque curtains | The outer fabric must provide the privacy you need when backlit. |
| Daylight and a darker bedroom | Sheers behind blackout curtains | Blackout fabric alone does not eliminate gaps around the installation. |
| A soft frame around existing blinds | Blinds or a shade behind curtains | The curtains must clear the headrail and controls. |
| Decorative side panels | Sheers with stationary outer panels | Fixed side panels cannot provide full-window privacy or darkness. |
| A visible sheer overlay | Sheers in front of opaque curtains | Use separate hardware if both layers need to move independently. |
Should Sheers Be Used On The Back Or Front?
Sheers are most commonly hung behind the heavy curtains. This way you can have the sheer to filter the light in during the day but have your outer curtains open either side.
Sheers can be hung in front of your curtain to create a decorative look. However you might want to choose this deliberately. Having your sheer in front will not give you the same bright filtered light when your opaque curtain is closed. For example if you have an embroidered sheer you could use this in front to soften the look of your plain opaque curtain.
Sometimes you may not need to layer your curtains. If you have a blind already installed which gives you the correct amount of privacy and light control then a single pair of curtains will give you a nice soft look. Or if one curtain meets your light and privacy needs then this could be enough.
2. Choose The Right Hardware
Make sure you have enough space between the two fabrics so they can hang and move freely. Ensure that the hardware will hold the weight. Check that the brackets are spaced correctly, will mount correctly and will be compatible with your curtain headings.
| Hardware | When to consider it | Main consideration |
|---|---|---|
| Double curtain rod | A visible rod with two coordinated layers | Fixed rod spacing must accommodate both fabrics and their headings. |
| Two separate single rods | Layers needing different projections or mounting positions | Plan both bracket layouts together to prevent interference. |
| Double curtain track | A discreet installation or a wide opening | Confirm mounting suitability, load capacity, gliders, and curtain compatibility. |
| Single rod with an attached liner | Adding a compatible lining to an existing curtain | The curtain and liner generally move as one unit. |
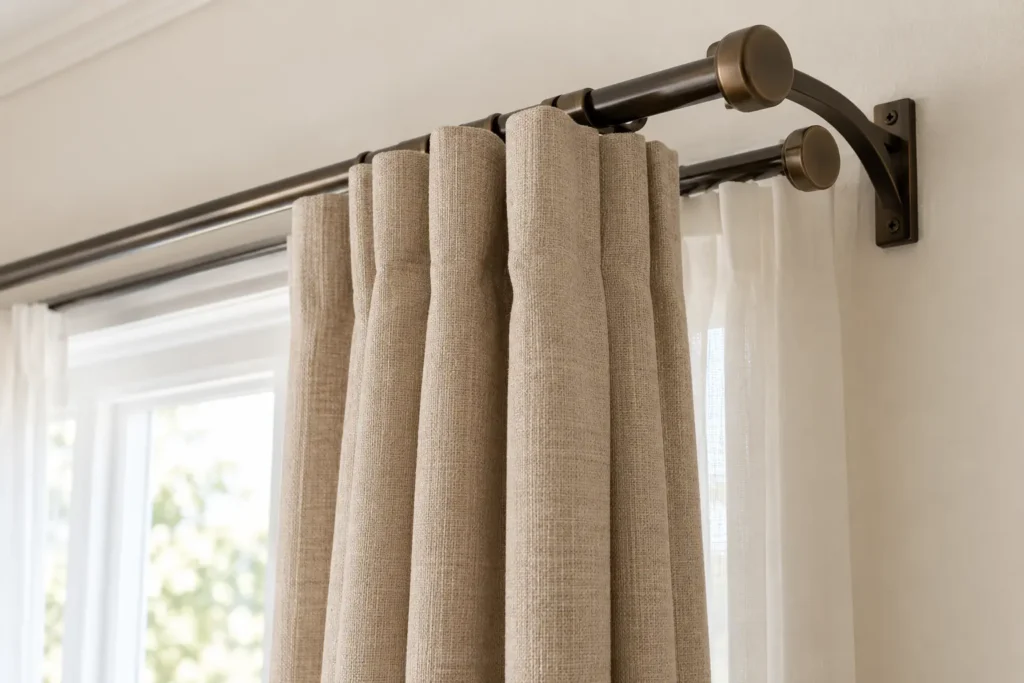
Heavy curtains don’t mean you can use any track. Check the manufacturer’s guidelines to ensure that it can hold the weight of the combined curtains.
Can I Layer My Curtains On One Rod?
You can create a nice decorative look but usually won’t be able to have two independently moving layers.
Having your heavy panels on the side and sheer in the centre can create a nice framed look but they won’t be able to pass each other as they are on the same rod. Alternatively you could have a compatible liner hanging behind your main curtain. This way everything will move together.
If you want your sheer and outer to fully open and close independently then you’ll want two separate rods/tracks.
3. Measure
Make sure you measure the area you plan to hang your curtains in. This will give you enough space to fully cover the opening, avoid any obstructions and allow for your fabric to gather.
Take the following measurements:
- Width of window including trim.
- Working width of your rod/track.
- Drop of each curtain (from where it will actually hang to where you want your hem to sit).
- How far out your rods/tracks will be.
- Depth of any obstructions (handles, sills, blind headrails etc).
- Side clearance for your curtains to gather (stack-back).
There is no set distance you should have between your rods. If your fabric is thick with deep pleats, grommets and heavy headings you may need more space than if you have sheers. Check what folds you want and the size of your brackets.
How Far Up And Out Should I Hang My Rods?
Hanging your rods above and outside your window frame will give the impression of a taller window. It will also expose more of your glass when the curtains are open. Once you’ve checked your ceiling, space on your wall, length of your curtains and what you’re hanging onto you can decide how high to hang them.
Don’t guess from a picture and hope standard panels will fit. Plan how long you want your curtains to be and where you want your hardware.
Should Both Curtains Be The Same Length?
To give a cohesive look to your floor-length curtains aim to have your hems line up. Alternatively you could have your inner sheer a little shorter so it doesn’t stick out from underneath your outer.
Even if your curtains have the same stated length on their packaging your hems may not match. The rings, hooks, rod pockets and gliders on your curtains will affect where your fabric starts hanging. Measure each curtain from where it’ll hang. If your floor isn’t even measure from both sides and the centre.
If you’ll be using your curtains daily having your hems just above the floor will make them easier to move and keep tidy. Measure how much clearance you want.
4. Work Out How Many Panels You’ll Need
Work out how many panels you’ll need for your sheer and outer. This will give you enough width to do what you want.
If you’re using ready-made panels sold by their flat width:
Total flat width = working width × fullness.
Number of panels = total flat width / flat width of panel (round up).
Fullness will depend on how much extra fabric you want to create folds. For example if you’re using 2× fullness you want twice as much flat fabric as the width you’re covering. The amount you’ll need will depend on the heading, fabric and manufacturer’s guidelines. The example below shows 2× but this is just an example.
Example:
Say you want both your layers to cover 200cm of your rod (working width). You’ve decided you want 2× fullness and you’re using ready-made panels which are 100cm wide when flat. So:
| Calculation | Sheer layer | Outer layer |
|---|---|---|
| Usable rod width | 200 cm | 200 cm |
| Illustrative fullness | 2× | 2× |
| Total flat fabric width | 400 cm | 400 cm |
| Flat width per panel | 100 cm | 100 cm |
| Panels required | 4 | 4 |
In this example you’ll need 8 panels. Make sure the seller is stating the measurements per panel or per pair. Also make sure that your hardware will allow your panels to meet and move as intended. If your brackets are in the centre it may split your rod into sections.
If you’re using made-to-measure curtains they may be measured by how much they’ll cover once finished, with fullness already included. Just follow the supplier’s guidelines for ordering. Any returns or centre overlaps will need to be considered.
5. How To Layer Your Curtains
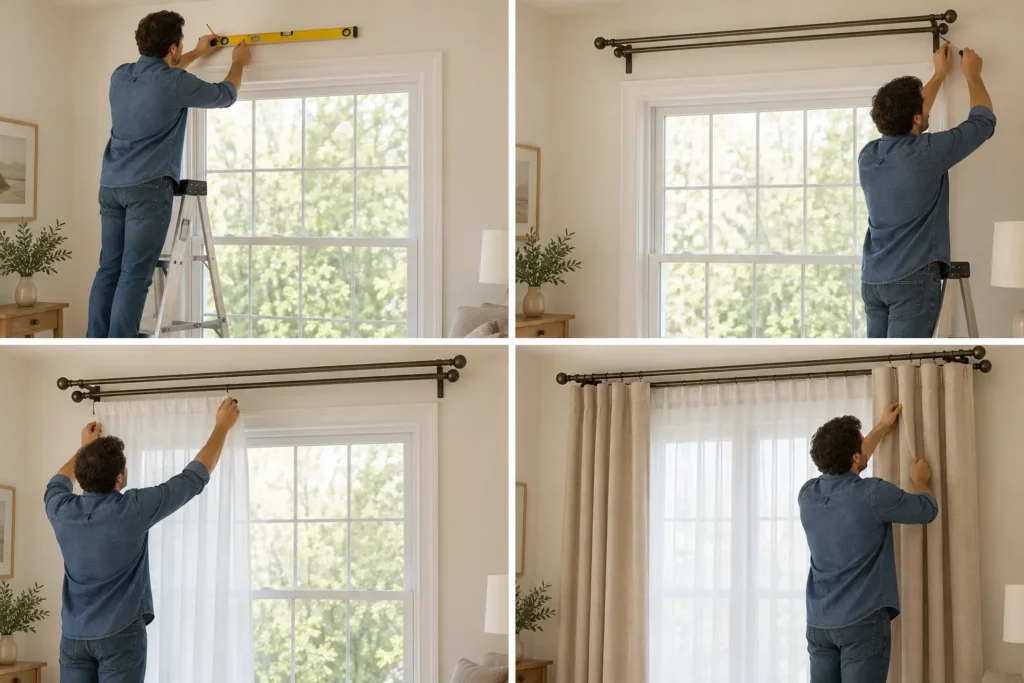
Tools Required
Most likely you’ll need your curtains, compatible rods/tracks, brackets, rings/hooks, tape measure, pencil, spirit level, screwdriver and a good step ladder. If you’re drilling you’ll also need a drill and fixings suitable for your hanging surface.
Follow the hardware instructions to ensure it can hold the weight, has the right supports and is installed correctly. Before drilling check for any hidden services. Ensure that your curtain fabric will not be too close to any heaters (follow the manufacturer’s guidelines).
Step 1: Prepare Your Curtains
Read your care labels and remove any creases caused by packaging using an approved method. Don’t iron or steam your blackout coating unless the manufacturer has said it’s okay. If you need to wash your fabric before hemming follow this step.
Step 2: Mark Your Hardware
Use your spirit level to mark where you’re going to hang your hardware. Make sure you’re taking both layers into consideration. Your outer curtain should clear the inner fabric and your inner should clear any handles, trim or existing blinds.
Before you fix anything in place check how your window opens. Your curtains shouldn’t stop you from accessing your handles or opening your window.
Step 3: Fix Your Hardware
Fix your hardware using the right fixings. Make sure you’re following the guidelines for spacing and any required intermediate supports. If you have a long/heavy installation you may need a different hardware system.
Step 4: Hang Your Inner Layer
Hang your sheers on your back rod/track. Evenly spread your fabric. Open and close your curtains to make sure they’re not snagging or restricting movement. Ensure they aren’t touching any window hardware.
Step 5: Hang Your Outer Curtains
Add your opaque/blackout curtains to your front rod/track. Close them fully to check they’ll fully cover the window. Open them to check your fabric is gathering.
Step 6: Adjust Your Folds
Even up your folds. If possible adjust the position of your hooks to help your hems line up. Check how they look from across the room.
Step 7: Test Your Layers Separately
Move your sheers whilst keeping your outer curtains still. Then do the opposite. Both should move without pulling the other fabric. Check privacy after dark and check for unwanted gaps letting light in during the day.
6. Check For Privacy & Blackout
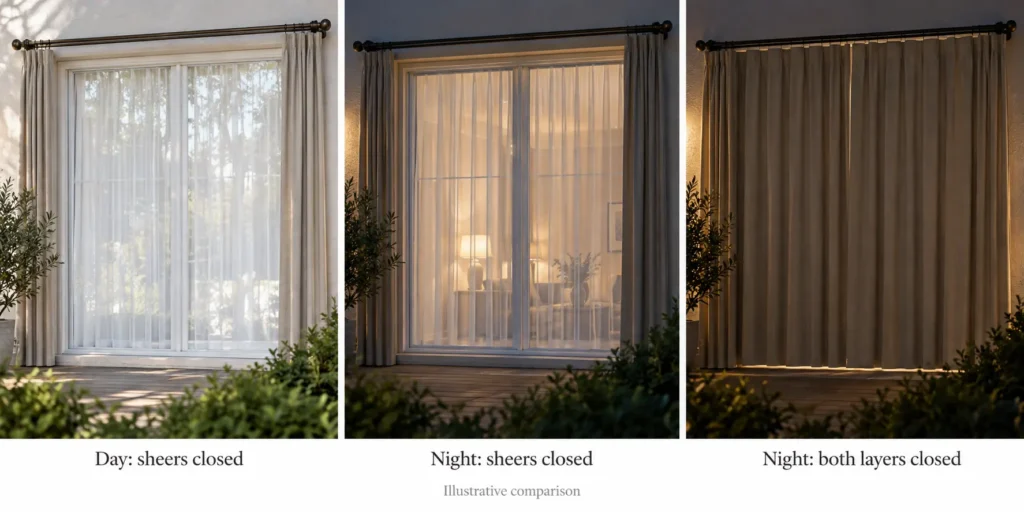
Will Sheers Give Me Privacy At Night?
Sheers won’t necessarily give you privacy at night. How much you can see will depend on the weave, lighting, angle and how far away you are. If your room is brighter than outside people may be able to see silhouettes or details from outside.
Test your window after dark with your lights on. If privacy is important use a suitable opaque curtain and close it fully.
| Curtain position | Typical use | Limitation |
|---|---|---|
| Both layers open | View and daylight | Little privacy from the curtains |
| Sheers closed, outer curtains open | Softer daylight | Privacy varies with the fabric and lighting |
| Both layers closed | Greater privacy and light reduction | Performance depends on opacity and coverage |
Why Is There Light Coming Through My Blackout Layered Curtains?
Just because your fabric is blackout doesn’t mean your window will be completely light-tight. Light can come through the top, sides, bottom and between your panels.
Find where the light is coming through. Depending on your system you may get a better result by having more coverage, a compatible centre overlap, side returns to the wall or an extra fitted shade. Ensure anything you add is compatible.
7. Choose The Right Fabrics, Colours & Textures
Choose your fabrics based on what you want them to do.
| Combination | Appearance | Practical consideration |
|---|---|---|
| White sheer + oatmeal textured curtain | Soft and understated | Check the outer curtain’s opacity rather than judging by colour. |
| Ivory sheer + lined navy curtain | Defined contrast | Confirm that the hardware carries the combined weight. |
| Plain sheer + patterned outer curtain | A clear decorative focal point | Repeat a colour from the pattern elsewhere in the room. |
| Embroidered sheer + plain opaque curtain | Detail concentrated in the lighter layer | Decide whether the embroidery should show against daylight or fabric. |
| Light sheer + velvet curtain | Strong texture contrast | Leave enough space for the heavier folds. |
Check your samples together in natural and artificial light. Sometimes warm ivory and cool white can look very different.
If both your fabrics are patterned try to vary the scale so you can still see the difference in the design. You can create depth using texture but keeping both in a similar colour family.
If you want your bedroom to be dark look for the construction or lining in the fabric. Just because it’s a dark colour doesn’t mean it’ll be blackout. Check both your care labels to make sure the curtains are properly looked after. They may need different cleaning methods.
8. Consider Your Room & Window
Bedrooms
Use sheer curtains with a suitable blackout outer if you want some natural light but darkness to sleep. Make sure you take care with the centre and sides.
Living Rooms
Use your sheer to soften the natural light. Choose your outer curtains to give you the right amount of privacy at night. If you have an existing blind for privacy you could just use decorative outer panels.
Home Offices
Ensure your layers will help with reducing glare on your screen. Test during the times when you’ll have direct sunlight on your workspace.
Bay & Corner Windows
Plan how you’re going to hang each section and where they meet. Make sure your brackets are in the right place. Check your curtains will move around the corners where intended. Make sure there’s enough room for your fabric to gather. You may need compatible bay poles or bent tracks depending on your window and curtain weight.
Sliding Doors
Ensure you have enough room for you to walk through daily. Check your handles will clear. Make sure there’s enough room to move your curtains out of the way. A traverse system or suitable track may help. But make sure they’ll open in the right direction.
Shallow Recesses & Small Rooms
Check if you can get suitable clearance using wall/ceiling-mounted hardware. If you’re getting too much bulk from having two layers consider a slimline shade with one curtain layer. If you don’t want to drill make sure you’re only using systems which can hold the actual combined weight and are suitable for the mounting surface.
9. Solve Common Issues
| Problem | Likely cause | What to check or change |
|---|---|---|
| Layers drag each other | Too little separation or interfering headings | Review projection, heading depth, and hardware compatibility. |
| Rod sags | Excess load, insufficient support, or unsuitable fittings | Compare the installation with the manufacturer’s load and support requirements. |
| Curtains look flat when closed | Too little fabric for the intended folds | Recalculate each layer using the appropriate fullness. |
| Open curtains cover too much glass | Insufficient stack-back space | Reconsider rod width, fabric bulk, or the hardware arrangement. |
| Sheer hem shows unintentionally | Different hanging points or uneven lengths | Adjust compatible hooks or alter the inner hem after checking the floor. |
| Curtains do not meet in the centre | Insufficient coverage or hardware restrictions | Check widths, centre brackets, stops, and overlap arrangements. |
| Panels catch on handles | Inadequate clearance | Reposition suitable hardware or choose a less bulky arrangement. |
| Light enters around blackout curtains | Gaps in the installation | Identify the entry point and improve compatible coverage. |
FAQ
If you want your layers to move separately you’ll need them to have separate travel paths. A double rod is one option but you could use two single rods in the right place or a double track.
Yes! You can use two sheers to add texture but don’t assume they’ll give you as much privacy/darkness as an opaque layer. Test them under the lighting conditions that matter to you.
Yes! Make sure your hardware is in the right place so your fabric will clear the headrail, controls and moving parts of your blind. Ensure you can still access your window and both will move freely.
Not necessarily. The thickness of your fabric and heading will affect how much fabric you’ll need. Work out how much you’ll need for each layer. Follow your curtain supplier’s guidelines.
If your fabrics are too overpowering they can feel quite bulky. Make sure you’re using lighter fabrics, the right proportions and enough stack-back space. If you’re short on space consider using a shade and single layer.
Window treatments can affect how much heat is transferred but it depends on the product, fit, installation and use. Having two layers won’t guarantee you’ll have a certain amount of energy saving.